Send Uncompressed Images on WhatsApp without Losing Quality
Here are 2 ways to send Uncompressed Images on WhatsApp and preserve the original quality of the images. Advertisement The time is long gone when we used to share our photos with […]
Here are 2 ways to send Uncompressed Images on WhatsApp and preserve the original quality of the images.
Advertisement
The time is long gone when we used to share our photos with friends and family through emails and text messages (those could be chargeable too). We are now in an era where sharing your moments is a lot easier, especially when you have the ability to send them through your favorite messaging app. But there’s a setback in that. If you’re a shutterbug, you might have already noticed that images sent over WhatsApp are automatically compressed and lose both size and quality. If you didn’t know, then I guess you know about it now. So here today, we will be putting down a few simple tricks to help you send uncompressed images on WhatsApp.
- How to Auto-reply Messages in WhatsApp, and Other Apps
- WhatsApp Messenger Tips And Tricks – Top Tips to Make the Most Out of it
- How to Hide Private Photos in Google Photos App
- Delete WhatsApp Sent Messages on Android
- Install Blob Emojis in WhatsApp and Telegram
Page Contents
How to Send Uncompressed Images on WhatsApp
So why does it happen? Why do the images lose quality and size when sent over WhatsApp?
Advertisement
Whenever you send an image, the WhatsApp servers compress the image size to make it easier to send and thus easier to download on the recipient’s end. And it does so for a reason, WhatsApp itself is not a dedicated app to share original quality images. It serves a different purpose, and that is to communicate using messages, voice calls, and video calls. Sending and receiving media and documents is sort of an additional privilege. This doesn’t mean that the images you share completely deteriorates. It will still be completely visible.
Advertisement
So, if you’ve got some professional DSLR images that you want to share with a contact, or if you decide to get the received picture printed. Or in any similar situation, the image quality will not be the same.
As an example, have a peak the size of the sent image (Original quality) and the one which was received (Compressed).
Advertisement
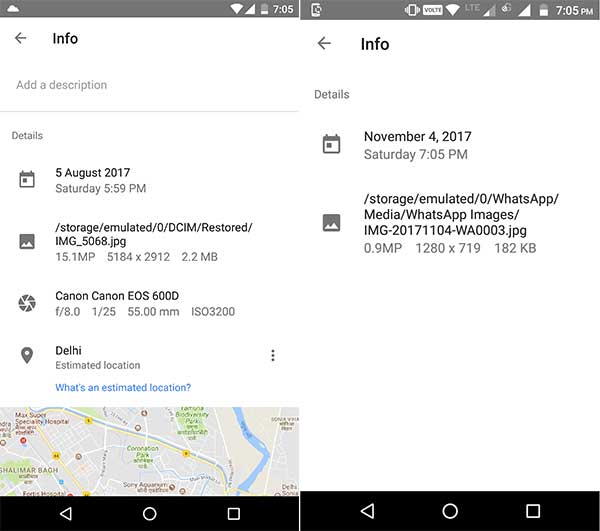
There’s a way to get past this situation with a very simple trick. It will help you send uncompressed images on WhatsApp and preserve their actual quality through the process.
Option 1: Send Images as Documents
The first and most easy method to do it by sending the images as documents. The option to share documents was introduced a few months ago and could be used for this purpose. WhatsApp allows its users to send documents up to 100 MB in size. So, it could be practically used to send even RAW images that could be as large as 20-40 MB in size.
Advertisement
- Launch ‘WhatsApp’ from the app drawer.
- Open the chat for the contact to whom you want to send the image(s).
- Tap on the attach icon (paper-clip).
- The allowed attachment options shall pop-up.
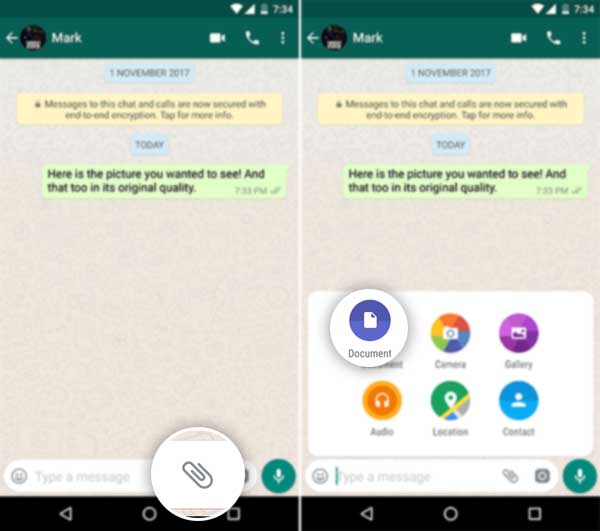
Send Uncompressed Images on WhatsApp – Attach as Document - Now, select the ‘Document’ option (Normally, you would select ‘Gallery’).
- The default document selection window will open. Select ‘Browse other docs…’ option at the top.
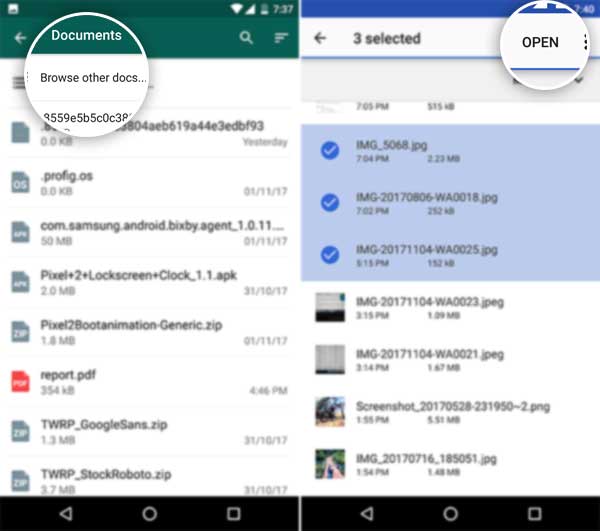
- This will open your phone’s default file manager app.
- So, browse through the storage and select the images that you would want to send.
- Once you have picked the images, confirm by pressing on the ‘SEND’ button.
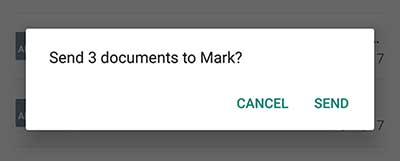
There you go! You have just been able to send uncompressed images on WhatsApp. The above option is more than sufficient for a few images, but if you really plan on sending more than just a handful, then even the option above could be frustrating. Supposedly you want to share the complete lot of photos that you shot at a friend’s wedding, then sending each and every image could be daunting for both the sender and the recipient.
Option 2: Archive the Images
You can easily opt for archiving the images and then send the archive itself as a document. Now before you send uncompressed images on WhatsApp, you need to archive them. The best way to do this is by installing a good quality file manager app that allows you to archive files. We personally recommend Solid Explorer and would be using the same to demonstrate the process.
- Once you have downloaded Solid Explorer, run it from the app drawer.
- Then, navigate to the folder where the images that you want to send are present (e.g. /DCIM/Camera).
- Start by long-pressing the first image, then go on tapping further until you have highlighted all those you want to send.
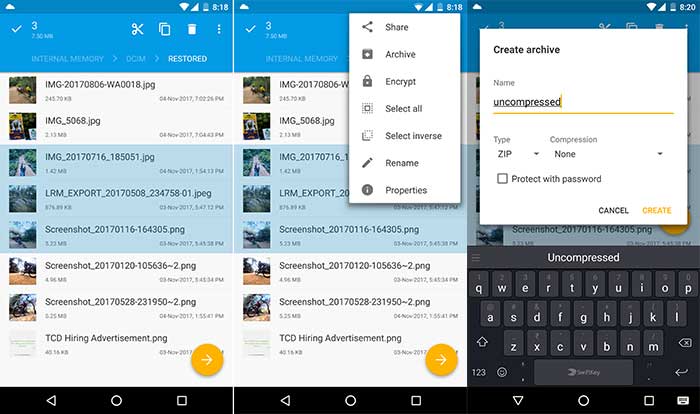
Send Uncompressed Images on WhatsApp – Archive Images - Now, tap on the 3-dot overflow menu icon on the top-right and select ‘Archive’.
- In the Create Archive box, set the ‘Compression’ type as “None” and select ‘CREATE’. The archive comprising of the selected images will be created.
Now open the WhatsApp chat, tap on the ‘Attach’ icon and select ‘Document’. Then browse through the storage and select the archive you just created. Finally, press the ‘Send’ button.
I believe the above laid down methods are sufficient enough for you to send Uncompressed Images on WhatsApp. If you have any problems using the tricks, then make sure to reach out to us through the comments.