Install TWRP Recovery and Root Samsung Galaxy Note 8 (Exynos) – A Complete Guide
A complete guide on how to install TWRP recovery, disable forced-encryption, prevent KG/RMM state, and root Galaxy Note 8 (Exynos) using Magisk.
In this guide, I will walk you through the steps to install TWRP recovery and root Samsung Galaxy Note 8 (Exynos) using Magisk. The files and the instructions provided in this tutorial are applicable to any Exynos-based Note 8 running Android Pie (One UI), Android Oreo, or Android Nougat.
Advertisement
If you are just stepping into Android software modding, then TWRP is a tool you’d want in your arsenal. TWRP is a custom recovery that allows you to flash custom ROMs/kernels/mods, take NANDroid backups, wipe partitions, and do so much more. Moreover, you can also use TWRP to flash Magisk and gain root access on your Galaxy Note 8 pretty easily.
Page Contents
- TWRP for Exynos Galaxy Note 8
- Supported Models
- Before You Start
- Downloads
- Instructions
- Step 1: Enable OEM Unlock
- Step 2: Boot your Galaxy Note 8 into Download Mode
- Step 3: Launch the Odin tool on your Windows computer
- Step 4: Install TWRP recovery on Galaxy Note 8
- Step 5: Boot your phone into TWRP recovery mode
- Step 6: Format data partition and reboot recovery
- Step 7: Disable encryption and prevent KG/RMM from triggering
- Step 8: Flash Magisk to root Galaxy Note 8
- Wrapping up
TWRP for Exynos Galaxy Note 8
Soon after the phone’s launch, official TWRP builds for the Note 8 were released by Recognized Developer corsicanu over at the XDA-Developers forum. Based on the Android Pie kernel source code, the recovery was recently updated to TWRP 3.5.0 and supports Exynos Galaxy Note 8 running Android Pie, Oreo, or Nougat.
While TWRP recovery for the Note 8 is extremely stable and fully functional, there’s one particular issue. That is, the recovery does not support Samsung encryption. Well, the issue could easily be dealt with by disabling encryption, something I have covered in this tutorial as well. This will allow TWRP to mount the /data partition and access the phone’s internal storage for flashing files, taking NANDroid backups, etc.
Advertisement
Further, the Note 8 is also affected by the missing OEM unlock issue caused due to triggered KG/RMM state. We will also be dealing with this issue and prevent it from being triggered again by using the RMM/KG Bypass ZIP file provided by XDA senior member and developer BlackMesa123.
With that aside, let me now show you how to install TWRP recovery and root the Exynos Galaxy Note 8 using Magisk. The instructions below will take you through the complete process in a comprehensive manner.
Important Info: Installing a custom binary, such as TWRP in this case will trip the KNOX counter permanently. You will not be able to use applications that rely on KNOX like Samsung Folder, Secure Pay, etc.
Supported Models
This guide is only meant for the Galaxy Note 8 with an Exynos chipset with “SM-N950F”, “SM-N950FD”, and “SM-N950N” model numbers.
Models with Snapdragon chipset that are sold in the USA and China with model numbers “SM-N950U”, “SM-N950U1”, “SM-N950W”, “SM-N9500”, “SM-N9508”, and “SM-N9506” are NOT SUPPORTED.
To check your Note 8’s model number, go to “Settings” > “About phone”.
If you have a USA/Canada model, then you could follow our tutorial on how to root Snapdragon Galaxy Note 8.
Before You Start
Requirements: The only things you will need during this tutorial are – (1) Your Galaxy Note 8, (2) A Windows computer, and (3) A compatible USB cable.
Now, there are a couple of things you should do ahead of the instructions.
Take a backup: Installing TWRP will erase all the data stored on your Galaxy Note 8. This will also include anything that’s stored on the phone’s internal storage. So make sure that you back up all your data beforehand. You could use Samsung’s Smart Switch software and follow our Android backup guide for guidance.
Install Samsung USB Drivers: In most cases, your Windows computer will install the required USB drivers automatically. But if you still face any issues with getting your Galaxy Note 8 recognized by your computer, then you might need to manually install the latest Samsung USB drivers.
Charge your phone: It is advised to keep your phone sufficiently charged to prevent it from shutting down in the middle of the process. 40-50% battery level is a good starting point in my opinion.
Downloads
Below, you will find the links to download the files you’ll need while performing the instructions. You can download and save these files on your computer beforehand. For easier access, consider moving all the downloaded files inside a separate folder.
Advertisement
- TWRP for the Galaxy Note 8: twrp-3.5.0_9-0-greatlte.img.tar or newer available in TWRP database
- DM-Verity and forced-encryption disabler: no-verity-opt-encrypt-6.1.zip
- KG/RMM State Bypass ZIP: RMM_Bypass_v3_corsicanu.zip
- Magisk installer ZIP: Magisk-v21.4.zip or newer available on Github
- Odin v3.14.1: Odin download repository (Extract the ZIP file after downloading)
Instructions
I have broken down the instructions into 8 major steps so that it’s easier for you to understand. These steps will take you through the complete process of installing TWRP recovery, disabling forced-encryption, and subsequently rooting Galaxy Note 8 using Magisk.
Step 1: Enable OEM Unlock
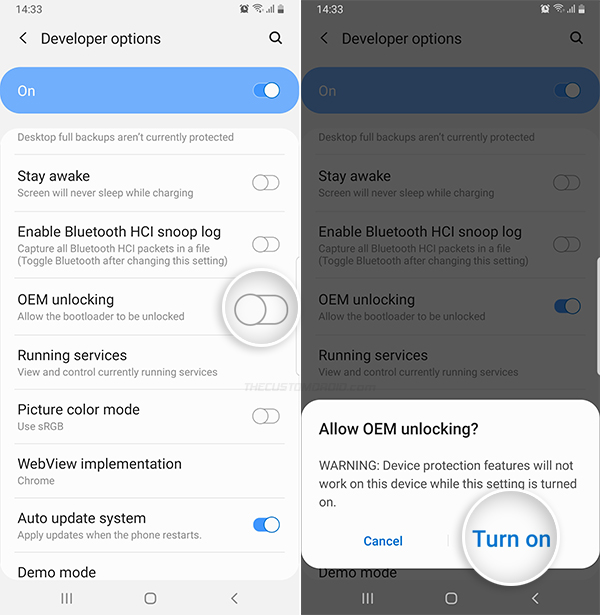
The first step of the process is to turn on OEM unlock option on the Galaxy Note 8. The option could be located inside the “Developer options” menu in Settings.
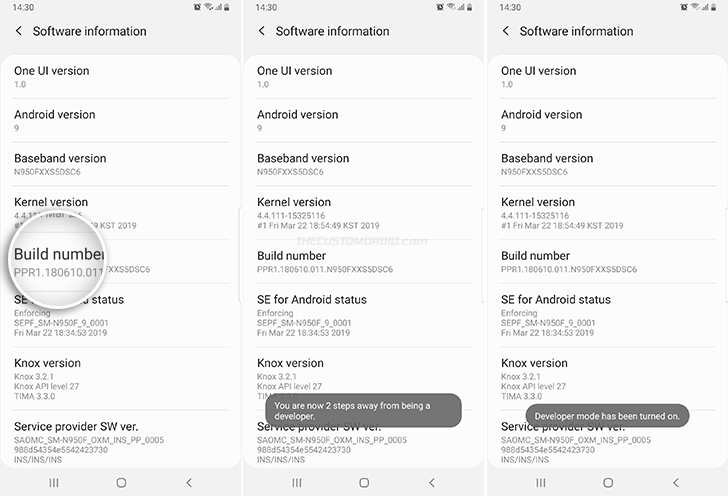
The menu itself is disabled by default to prevent accidental access. To enable Developer Options, go to “Settings” > “About phone” > “Software information” and repeatedly tap the “Build number” section for 5 times.
Once done, go to “Settings” → “Developer options” to access the menu. Then find “OEM unlocking” and toggle it to ON.
Is the OEM unlock missing? You could try a trick I posted that might help you bypass the 7-day waiting period before the toggle appears again.
Step 2: Boot your Galaxy Note 8 into Download Mode
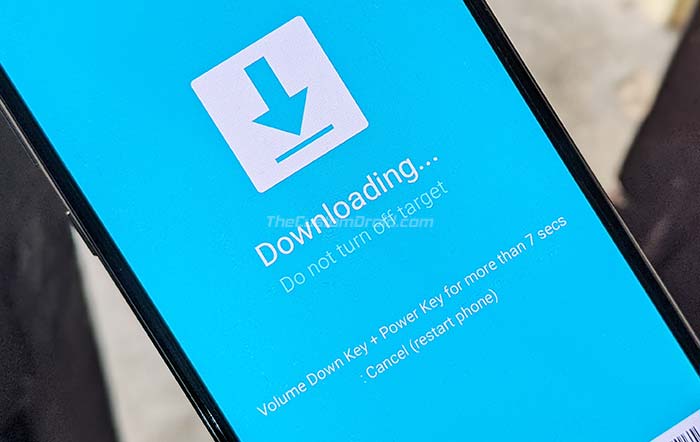
In order to use Odin to flash TWRP, you must boot your Galaxy Note 8 into Download Mode.
To do this, first power off your phone completely. Then hold the Volume Down, Bixby, and Power keys together until you see the blue-colored warning screen. Finally, press the Volume Up key to continue and enter Download Mode.
Connect your Note 8 to the computer via the USB cable while it’s in Download Mode.
Advertisement
Step 3: Launch the Odin tool on your Windows computer
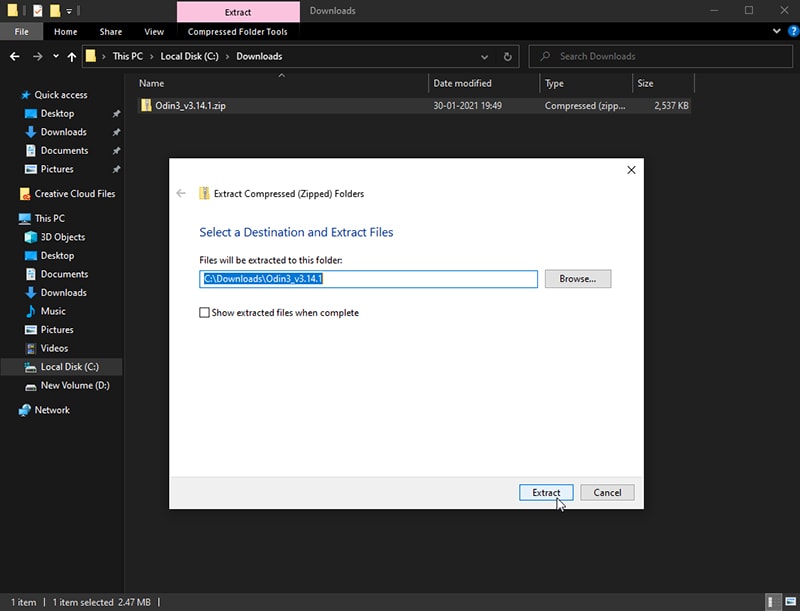
Now, locate the ZIP file of the Odin tool you downloaded to your computer. Then right-click the “Odin3_v3.14.1.zip” file and select “Extract all” from the contextual menu.
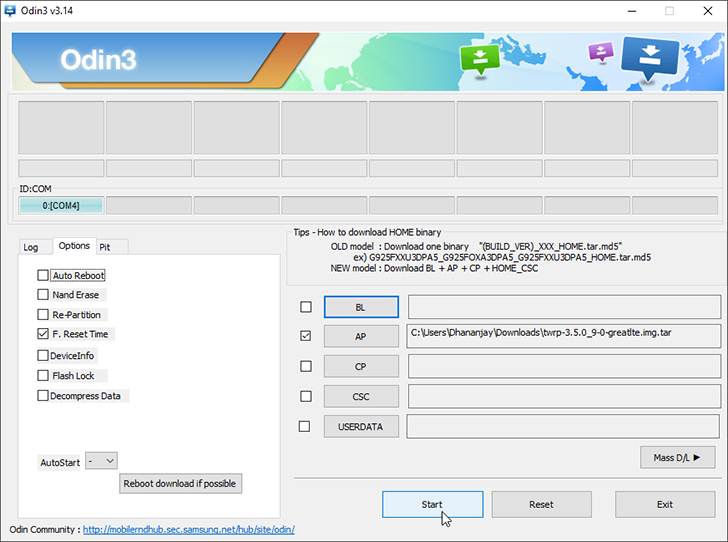
Go to the extracted folder and double-click the “Odin3 v3.14.1” executable file. The Odin tool GUI should now appear on your computer’s screen. The tool will automatically identify your Note 8 in Download Mode and highlight the corresponding COM port on the top-left.
Step 4: Install TWRP recovery on Galaxy Note 8
It’s time to finally flash the TWRP recovery on your Note 8. To do this, click the “AP” button in Odin to open the file selection window. Then navigate to the location where the TWRP TAR file (e.g. twrp-3.5.0_9-0-greatlte.img.tar) was downloaded and select it.
Once the TWRP is loaded in the AP slot, click the “Options” tab and uncheck “Auto Reboot”. Finally, click “Start” to flash the file and install TWRP on your Galaxy Note 8.
After the flashing process finishes, you should see the “PASS!” message in Odin. Now disconnect the phone from the computer (do not power off or reboot it) and close the Odin tool.
Step 5: Boot your phone into TWRP recovery mode
Now, it’s extremely important to boot your Note 8 directly into TWRP recovery mode after the flash. Your phone cannot boot into the OS right now due to DM-verity. But that’s not important right now because Magisk will automatically deal with it.
What’s more important is that if the phone attempts to boot into the OS, the bootloader will detect a modified partition and trigger the KG/RMM state. Remember I asked you to uncheck “Auto Reboot”? It ensured that your phone does not automatically boot into the OS after the flash completes.
That aside, here’s what you need to do to get your Note 8 into TWRP:
Advertisement
- Hold the Volume Down, Bixby, and Power keys for about 7 seconds to exit Download Mode.
- As soon as the screen turns off, release the Volume Down key and quickly hold the Volume Up key while still holding Bixby and Power keys.
- Keep holding Volume Up, Bixby, and Power keys until you see the TWRP splash screen (often takes 10-15 seconds).
Again, this part is extremely important. If you get the key combination wrong and the KG/RMM state is triggered, then you will need to restore the stock firmware and wait for another 7 days before you could attempt TWRP installation and root again.
Step 6: Format data partition and reboot recovery
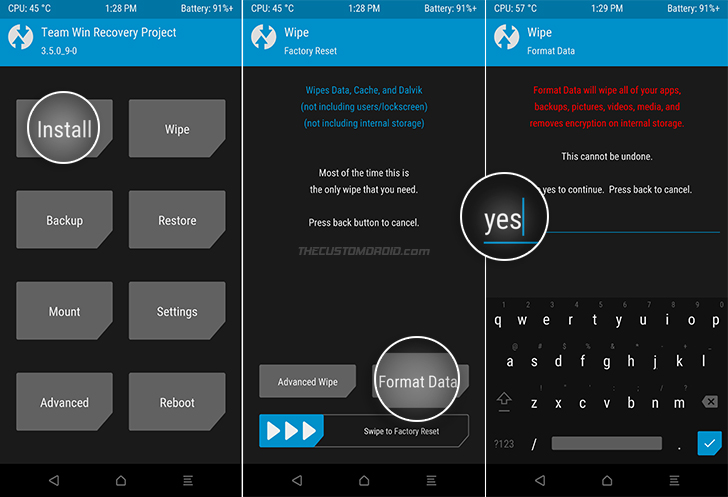
In order for TWRP to read the files from the phone’s internal storage, you will need to decrypt the /data partition. This is very easy. Just go to “Wipe” → “Format Data” from the main screen and enter “yes” in the provided field.
Once the partition has been formatted, go back to the main screen, select “Reboot” and choose “Recovery”. This will reboot your Galaxy Note 8 back into recovery mode and allow TWRP to finally access the files on the internal storage.
Step 7: Disable encryption and prevent KG/RMM from triggering
Although your Note 8’s /data partition has been decrypted, it will be encrypted again with the forceencrypt flag in the kernel. You will need to flash the forced-encryption disabler via TWRP, which will patch the kernel and disable this flag. The disabler will also patch and disable DM-Verity at the same time.
Further, you will need to flash another ZIP file that will prevent RMM/KG state from triggering again.
To do this:
- Connect your phone to the computer via the USB cable while it’s in TWRP mode.
- Go to the “Mount” menu and ensure that the MTP is enabled.
- Copy the “no-verity-opt-encrypt-6.1.zip” and “RMM_Bypass_v3_corsicanu.zip” files to the phone’s internal storage.
- Go back to the TWRP main menu and press “Install”.
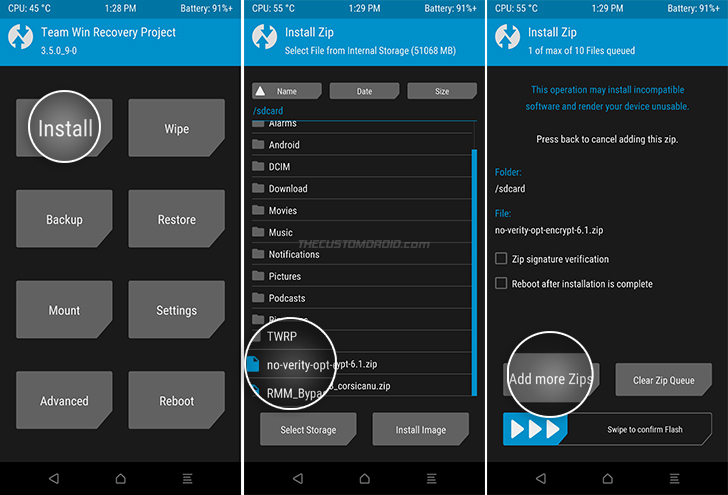
- Navigate to the internal storage and select the “no-verity-opt-encrypt-6.1.zip” file.
- Select “Add more Zips” and choose the “RMM_Bypass_v3_corsicanu.zip” file to add it to TWRP’s flashing queue.
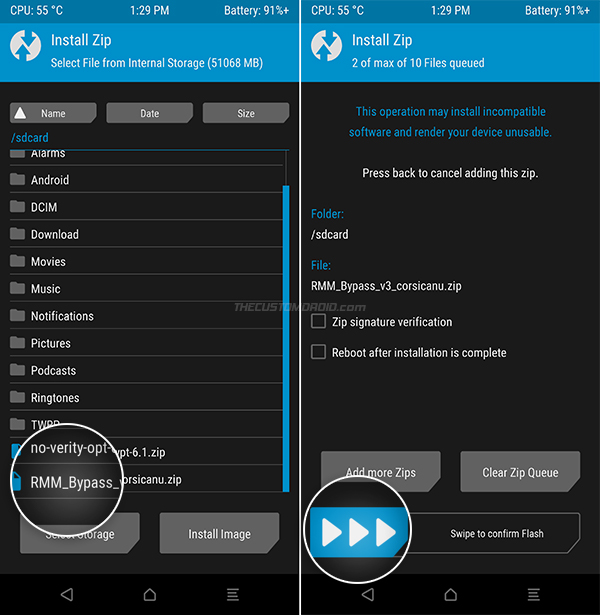
- Finally, swipe the button on the bottom of the screen to flash both the files.
Step 8: Flash Magisk to root Galaxy Note 8
This brings us down to the final step of the process that is to flash the Magisk ZIP file through TWRP recovery to root your Galaxy Note 8. To do this:
- Connect your phone to the computer via the USB cable while it’s in TWRP mode.
- Go to the “Mount” menu and ensure that the MTP is enabled.
- Copy the “Magisk-v21.4.zip” file to your Galaxy Note 8’s internal storage.
- Go back to the TWRP main menu and tap “Install”.
- Navigate to the internal storage and select the “Magisk-v21.4.zip” file.
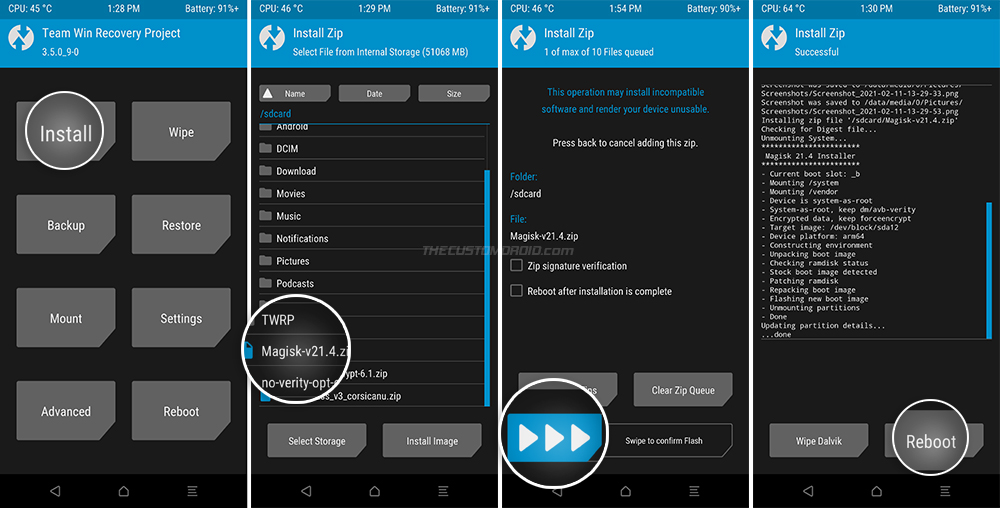
- Finally, swipe the button on the bottom of the screen to root your Galaxy Note 8 using Magisk.
After the flash completes, press “Reboot” and select “System” to finally boot your phone into the system (OS). Once the device boots, you can go through the initial setup, connect your phone to the internet and log into your accounts.
Wrapping up
Your Samsung Galaxy Note 8 should now be rooted and have TWRP recovery installed on it.
You can verify root by launching the Magisk Manager application and checking Magisk’s installation status. You can now install and use root applications such as Titanium Backup, or install modules like ViPER4Android and Xposed Framework.
Starting with Magisk v20.4, Magisk Hide is disabled out-of-the-box on new installations. So, make sure that you enable it from the Magisk Manager settings.
While at it, you can also check if your rooted Galaxy Note 8 passes SafetyNet. If SafetyNet fails and shows ‘Hardware’ evalType, it means that Google’s new hardware-backed attestation is now in effect on your phone. You can try fixing this by using the Universal SafetyNet Fix module.
With TWRP installed, you can now backup and restore NANDroid and install custom ROMs that are available on the XDA-Developers forum.
So by now, you have learned how to install TWRP recovery and root Galaxy Note 8 using Magisk. If you have any questions or face any difficulties while performing the instructions, feel free to let me know.
Comments 9 Comments
Wow, this actually worked! I bought a rare Exynos Note 8 with Android Oreo, mainly to use the Dual Camera feature instead of buying an S21 for Director’s View or a Note 20 for Dual Camera record. With the older Dual Camera feature, I can record AND take photoe with BOTH cameras! I know I won’t have the latest and greatest cameras and processor but I have a phone that still works well in 2021. After following your easy-to-follow guide and recorded some footage for my YouTube Channel, I am now fully rooted and can FINALLY use 4K@60fps on my Note 8 without the 5 minute recording limit!! You have no idea how happy I am right now. Thank you for this guide and I will be sure to share this with my YouTube channel viewers.
Hey Dhananjay!
I tried to install TWRP and Magisk on Samsung A50. Spent much time but finally TWRP and Magisk were installed successfully…
But when I rebooted the phone Magisk root dissappeared lol and now I don’t know how to bring it back. I tried flashing Magisk though TWRP but it doesn’t help. 🙁 Can you please help me with this?
Also, after I installed TWRP and Magisk the Camera doesn’t work anymore lol. Maybe you know how to fix it aswell?
Jake, try installing the Magisk app manually. You can download the latest version from the GitHub releases page.
After installing, launch the app and check Magisk’s installation status. It should display the installed Magisk version which should let you know if the rooting process went through or not.
Hi Dhananjay!
I downloaded that Magisk app.
Can you please help me now to figure out which Patch File should I flash for rooting? Because it’s the only option Magisk offering me for rooting. 🙁
Screenshot 1: https://imgur.com/a/fwl84Hw
Screenshot 2: https://imgur.com/a/DmkzJj3
Screenshot 3: https://imgur.com/a/tfPv0Me
If I am not wrong, you’re trying to root your Galaxy A50 with Magisk, without using TWRP, right?
The first time I tried to root Samsung A50 via TWRP and it was successful but when I rebooted the phone the root gone. 🙁 When I tried to root again the same way it didn’t help, the root just didn’t appear. And now I don’t know what to do 🙁
Okay, so I went through all the TWRP threads for the Galaxy A50 over at XDA. The issue you’re facing is a known bug. The situation with TWRP seems way more confusing at the moment. There are recoveries that are pre-patched with Magisk (which should be avoided generally), and then there are other builds that would not work on newer software updates.
Anyways, I think you should be able to root your phone with just Magisk. Since I haven’t tried it, I couldn’t confirm. But the method should work.
Ok, thanks!
But I still have no idea what File to patch for the Magisk to root the phone. Maybe you know?
https://imgur.com/a/tfPv0Me
Yes, you need to patch the AP firmware file.
According to the screenshots you shared in the previous comment, your Galaxy A50 does not have the Ramdisk in the
/bootpartition.So, you need to install Magisk to the
/recoverypartition and follow exactly what the S10 users do.Check out the Galaxy S10 rooting guide. You need to follow the exact same process. Just make sure that you download and use the firmware for your Galaxy A50, and not the S10.