How to Install TWRP Recovery and Root Moto Z2 Force
Want to install a custom ROM or customize your Motorola device with mods like ViPER4Android or Xposed Framework? Then follow this guide to install TWRP recovery and root Moto Z2 Force. Advertisement […]
Want to install a custom ROM or customize your Motorola device with mods like ViPER4Android or Xposed Framework? Then follow this guide to install TWRP recovery and root Moto Z2 Force.
Advertisement
The device was released back in July 2017 but was only limited to certain markets. It will be making its way to India on 15 February along with the Moto TurboPower mod. The modular design of the Moto Z2 Force allows you to use the dedicated snap-on accessories for additional functionality. LG initially tried entering the modular-device scene with the G5, but it wasn’t a total success for the manufacturer. However, Motorola, on the other hand, is still striving to make it the next big thing when it comes to smartphones.

Being on the top of the line, the latest successor of the Moto Z series sports the new-age Qualcomm Snapdragon 835 processor, a 5.5-inches P-OLED display, a dual-12 MP shatterproof camera, and much more. Despite the awesome hardware features, the phone is yet to make its mark in terms of software. Now, if you want to make changes to the internal software of the device, then follow the steps to install TWRP recovery and root Moto Z2 Force.
Page Contents
Guide to Install TWRP and Root Moto Z2 Force
Motorola follows the stock Android experience when it comes to the software. Apart from its own proprietary software, there’s not much you could do with it. For instance, if you would want to change the interface, you will only be forced to use a third-party launcher and icon packs to achieve the task. Similarly, it also doesn’t support any high-end audio customizations such as Dolby Atmos. While staying close to stock AOSP has its privileges, it does lead to a few shortcomings.
Advertisement
Advertisement
Anyhow, if you have been able to get your hands on the phone, then you can follow the easy steps below to install TWRP recovery and root Moto Z2 Force. But before we get to that, let us take a quick look at some major benefits of rooting your Moto smartphone.
- Remove pesky pre-installed apps (bloatware)
- Automate everything with famous tools like Tasker.
- Real-time backups of the firmware and data using Nandroid.
- Enhance the performance by overclocking the CPU.
- Use root-enabled applications like file managers, custom gestures, and more.
- Avail the wider range of themes and customization options like Substratum.
- Block annoying ads system-wide
These are merely a few of a plethora of things you can do once you root Moto Z2 Force. While rooting was once a risky process and could leave the device in an irrecoverable state, things have flipped now. If you somehow manage to adrift yourself from the instructions or simply unroot your device, you can easily flash back the stock firmware using Fastboot.
Advertisement
TWRP has finally added support for the device. Which means you can now officially install TWRP recovery on Moto Z2 Force. Since the device follows the A/B partition system, you will first need to boot into the recovery and flash the TWRP. The new recovery supports complete decryption as well. Post that, you can easily install SuperSU zip to root Moto Z2 Force. The instructions have been laid down in detail so that you can easily perform the task.
Prerequisites
- First off, take a complete backup of your data. If done wrong, the process could lead to data loss. We suggest that you follow our guide to backup Android devices.
- Charge your phone to a sufficient battery level.
- In order to install TWRP recovery on Moto Z2 Force, you will need to set up ADB and Fastboot on your PC.
- Install Motorola USB drivers on your PC.
Once you have fulfilled the stated requirements, download the files and proceed to the instructions to root Moto Z2 Force.
Advertisement
Downloads
Install TWRP Recovery on Moto Z2 Force
- Download the installer zip file and transfer it to the phone’s storage.
- Next, download the TWRP recovery image.
- Copy the “twrp-3.2.1-0-nash.img” file to C:\adb, where the ADB and Fastboot binaries are present.
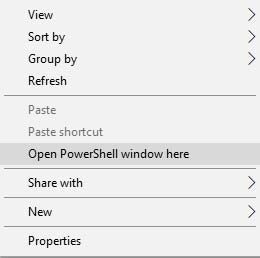
- Hold down the SHIFT key on the keyboard and right-click on an empty space inside this folder.
- Select “Open PowerShell window here”.

- Power off the device completely.
- Hold the Volume Down + Power button to enter into bootloader mode.
- Connect your phone to the PC.
- Execute the following command to boot TWRP recovery on Moto Z2 Force:
fastboot boot twrp-3.2.1-0-nash.img
- Your device will immediately boot into TWRP recovery.
- In the recovery’s main menu, tap on “Install”.
- Select the TWRP installer zip file.
- Finally, swipe the button on the screen to install TWRP recovery on Moto Z2 Force.
- Don’t boot your phone yet. Move onto the next steps to root Moto Z2 Force.
The next section will first guide you to optionally disable encryption on the device. If you like, you can skip that and directly proceed to step 5.
Disable Encryption and Root Moto Z2 Force
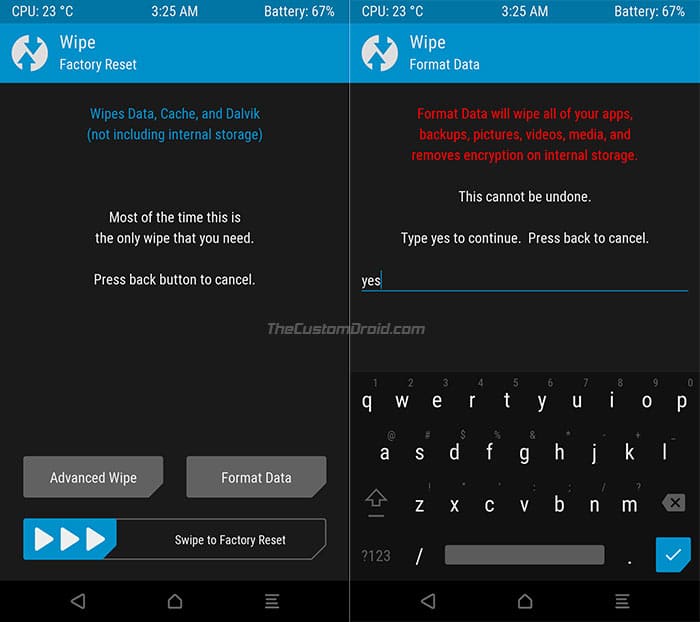
- In TWRP, go to “Wipe” -> “Format Data”.

- Enter “Yes” in the provided field.
- This will wipe the device. To completely disable encryption, follow the next steps.
- Go to “Reboot” and select “Recovery” to restart TWRP.
- Open the “Mount” menu and tap on the “Enable MTP” button.
- Connect your phone to the PC.
- Transfer the SuperSU/Magisk zip file to the storage.
- Disconnect the phone.
- In the TWRP main menu, tap on “Install”.
- Select the SuperSU/Magisk root zip file.
- Finally, swipe the button on the screen to root Moto Z2 Force.
- Once the flashing process is finished, hit “Reboot System”.
When your device boots, you shall be able to use root apps and install mods like ViPER4Android or Xposed. If you have chosen Magisk as the preferred root method, you can also install Magisk modules to add third-party features to the device. So start exploring new options to customize your Moto device.
You have succeeded to install TWRP and root Moto Z2 Force. If you have any questions, leave them down in the comments.