Install Android Pie-based Samsung Experience 10 on Galaxy S9/S9+ (Guide)
A build of Samsung Experience 10 based on Android Pie is now available for the Galaxy S9 and Galaxy S9+. This tutorial will guide you on how to install Samsung Experience 10 […]
A build of Samsung Experience 10 based on Android Pie is now available for the Galaxy S9 and Galaxy S9+. This tutorial will guide you on how to install Samsung Experience 10 on Galaxy S9/S9+ right now and enjoy all the new features.
Advertisement
Samsung is certainly not an Android manufacturer that one would vote for when it comes to software updates. The OEM took months before Android Oreo finally made its way to the flagship devices at that time. However, it does seem like Samsung is picking up a bit of pace.
A recently leaked firmware based on Android Pie is now available for the 2018 flagships which indicate that Samsung is already internally testing the upcoming Android Pie update for Galaxy S9/S9+ in form of Samsung Experience 10. The firmware, however, is now available for the Snapdragon Galaxy S9/S9+ users.
Advertisement
Page Contents
Samsung Experience 10 for Galaxy S9/S9+ – Changes and New Features
First and foremost, there a few things you should note. This is an alpha build of Android Pie-based Samsung Experience 10, which is very early in the development process. So, there are features that are either missing or broken. Not to mention, but there are bugs as well that you’ll need to cope up with.
Before you head over to the instructions and install Samsung Experience 10 on Galaxy S9/S9+, let us dive into the new features and changes that accompany this build.
Update (8 December 2018): One UI Beta based on Android Pie (Formely Samsung Experience 10) is now available for the Galaxy S9/S9+.
Update (7 October 2018): Samsung Experience 10 (CRI7 firmware) is now available for the S9/S9+. The download links and instructions have been updated.
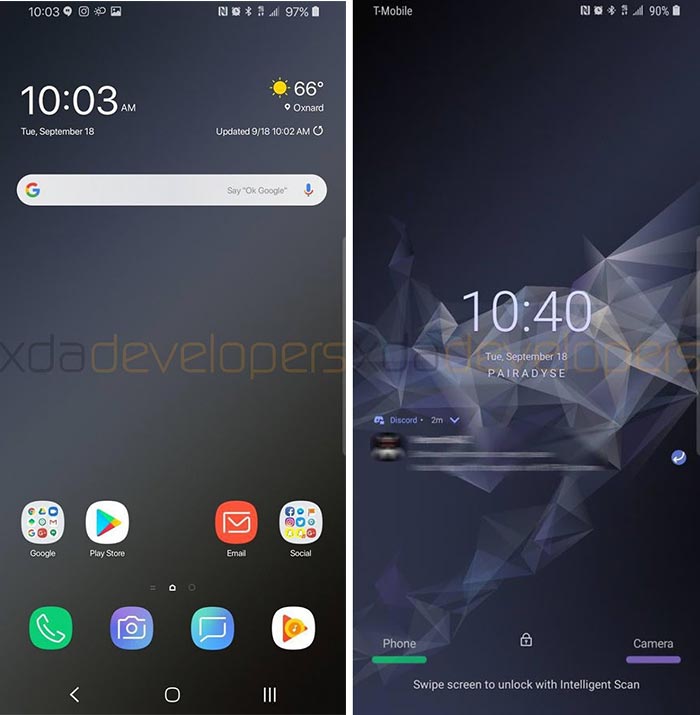
Since this update is based on Android Pie, it offers the plethora of standard Pie features including revamped QS/device settings, Digitial Wellbeing, and more. But that’s not it, there are tons of other changes specific to Samsung Experience 10. For starters, the UI has been completely revamped to match the Android Pie-style curved cards throughout the system, very similar to what you might have seen on the Google Pixel devices.
Advertisement
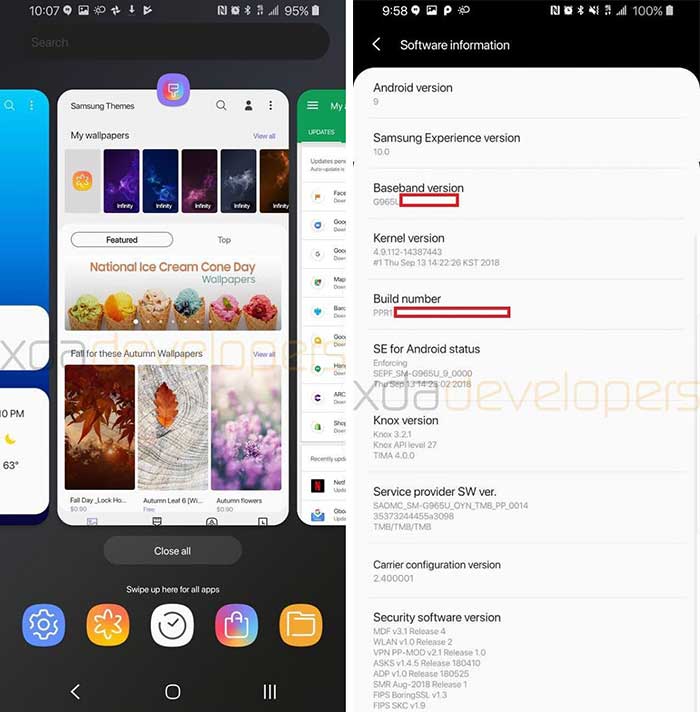
And then, there’s a Night Theme that offers dark colors across the full user interface. According to XDA, the theme seems to be either broken/or incomplete since there’s no way to switch to a Light theme. Although, within the device settings, there are options present to schedule the theme or even set the Automatic Mode to enable Nigth theme in dark environments. Over to the lock screen, the clock and date have been moved to the center. Also, the quick access apps at the bottom now display the app icon’s color instead of the complete icons. Furthermore, the Recents overview window now follows the same design scheme as on Android Pie with horizontal scrolling.
Recommended: Download Samsung Experience 10 Launcher for Galaxy Devices (Android 8.0+)
Now comes the turn of the system apps that come pre-installed on Samsung Experience 10 for Galaxy S9/S9+. All the system apps including Samsung Dialer, Samsung Messages, Bixby, Samsung Mail, Internet, Gallery, and Camera apps now offer a completely new UI and a few of them also incorporate some new features. For the detailed info, visit the source link at the bottom of this post.
Thanks to Rydah (SamCentral) and XDA, we now have hands on the screenshots of the Galaxy S9+ running Samsung Experience 10 based on Android Pie.
Advertisement
So how did Samsung do this, this fast? – Well, I think we already know the answer; Project Treble. Both the Galaxy S9/S9+ come with Android Oreo out-of-the-box and thus support Project Treble. We have seen its effect with other OEM devices such as the Essential Phone and OnePlus 6. And it’s the same reason that Samsung has been so quick in building and testing Android Pie-based Samsung Experience 10 on Galaxy S9/S9+.
Warning!
This build is NOT stable for daily usage. It contains bugs and broken features that would disturb the normal functioning of the phone. For example, the front camera does not work. And there could certainly be many more.
So, if you’re not comfortable with it or working with Odin to flash the firmware, then DO NOT INSTALL this.
Prerequisites
- Following this method will wipe all the apps on the phone and related data, except for the internal storage. We strongly suggest that you take a full backup of all your data before proceeding.
- These instructions are only meant for the Samsung Galaxy S9 and S9+ running Snapdragon processor sold in the US. Do not attempt to install this on an Exynos-based device.
- Download Odin 3.13.1 and extract the zip on your PC.
- Also, download and install Samsung USB drivers on the PC.
- In order to sideload the Android Pie-based CRI6/CRI5 firmware, you must also install Android platform-tools on the PC. Alternatively, you can also use Minimal ADB and Fastboot tool.
Downloads
The files linked below are provided by XDA senior member legojoe8. We thank him and the XDA community for making this happen and allowing the users to enjoy Samsung Experience 10 on their devices.
Samsung Galaxy S9 (G960U): ARG8 -> CRI7
Samsung Galaxy S9+ (G965U): ARG8 -> CRI7
Advertisement
How to Install Samsung Experience 10 on Galaxy S9/S9+
Installing Android Pie-based Samsung Experience 10 on Galaxy S9/S9+ is a two-step process. First, you must ensure that your device is running the Oreo-based ARG8 firmware. If you already have it installed, skip Step 1 and head directly over to Step 2. The second and the final step is to sideload the CRI7 OTA via stock recovery.
Step 1: Flash ARG8 Firmware using Odin
- Download ARG8 Odin flashable firmware for your Galaxy S9/S9+ from here and here, respectively.
- Extract the downloaded file to an easily accessible location on the PC.
- Power off your Galaxy S9/S9+ completely.
- Boot your phone into Download Mode by pressing and holding Bixby + Volume Down + Power button simultaneously.
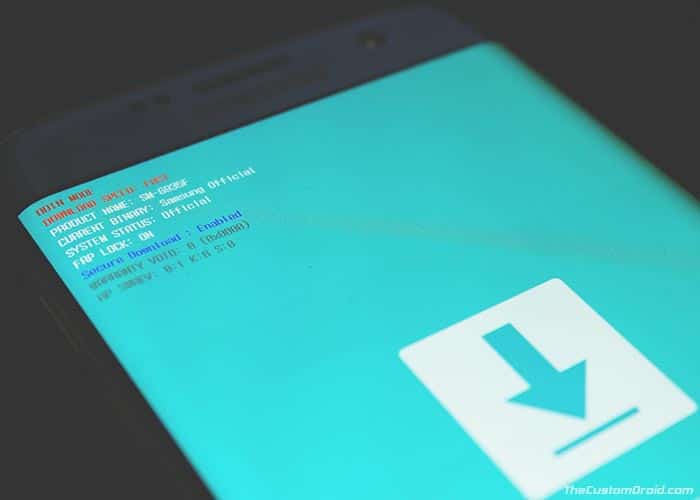
- Connect the phone to the PC using the USB cable.
- Launch Odin 3.13.1 by double-clicking on the Odin3 3.13.1.exe executable file.
- The ID:COM port on the Odin window should light up Blue.
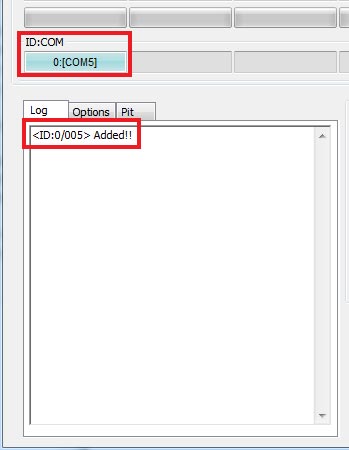
- Click on the AP, CP, BL, and CSC buttons and select the corresponding files.
- For CSC, make sure to select the ‘HOME_CSC’ file and leave the regular CSC.
- Finally, click on the ‘Start’ button to install ARG8 firmware on Galaxy S9/S9+.
Once the process finishes, the phone will automatically boot into the OS. Now, follow Step 2 to finally install Samsung Experience 10 on Galaxy S9/S9+ Snapdragon.
Step 2: Sideload CRI7 OTA using Stock Recovery
- Download Samsung Experience 10 OTA (CRI7) for your Galaxy S9/S9+.
- Copy the download OTA zip to C:\adb, where the ADB and Fastboot binaries present on the PC.
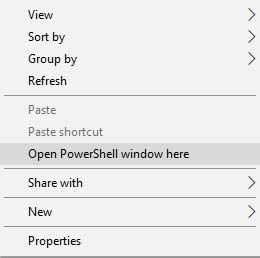
- Hold the SHIFT key and right-click on an empty space inside the folder.
- Select ‘Open PowerShell window here’.
- Power off your Galaxy S9/S9+ completely.
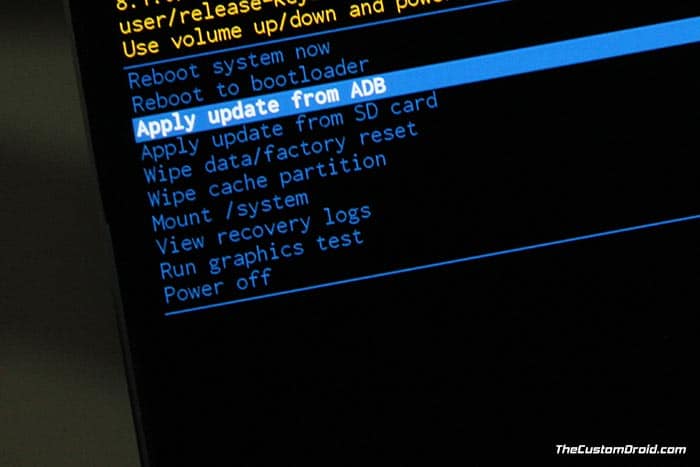
- Hold the Bixby + Volume Up + Power button simultaneously to enter stock recovery mode.
- Use the Volume keys to highlight ‘Apply update from ADB’ and press the Power button to select it.
- Connect the phone to the PC using the USB cable.
- Verify the device-PC connection using:
adb devices - The command shall return the device ID along with the ‘sideload’ message.
- Finally, install Samsung Experience 10 on Galaxy S9/S9+ by sideloading the OTA using:
adb sideload update.zip - When the sideloading finishes, select ‘Reboot system now’ in the recovery.
Your Galaxy S9/S9+ should now boot into Android Pie-based Samsung Experience 10. You may go ahead and explore the system for new features.
As told earlier, this build contains issues and broken features. So, you will need to adjust with them if you really wanna enjoy the features. A future build might resolve the existing problems, so keep an eye out on this post for updated links and instructions in the future.
So, you have just been able to install Samsung Experience 10 on Galaxy S9/S9+ Snapdragon. If you have any doubts about the procedure mentioned here, feel free to ask us via the comments.
Source: XDA

