Install OxygenOS on OnePlus Devices using Local Upgrade (Guide)
The instructions in this guide will help you install OxygenOS on OnePlus devices using Local Upgrade option in Settings. Advertisement OnePlus has been in full-form since December and has been launching Oreo-based […]
The instructions in this guide will help you install OxygenOS on OnePlus devices using Local Upgrade option in Settings.
Advertisement
OnePlus has been in full-form since December and has been launching Oreo-based OxygenOS update for all its supported devices frequently. One thing that we have to list over and over again, is the instructions to install those updates manually. Well, the fact is that the instructions stay the same for every OnePlus device. Which makes it redundant for us to insert them each time a new software update is announced. To overcome this situation, we have developed this detailed guide to help you install OxygenOS on OnePlus devices using Local Upgrade option.

- Install TWRP and Root OnePlus 5T on Android 8.0 Oreo (OxygenOS)
- Restore OnePlus 5T to Stock Firmware and Relock Bootloader
- Enable OnePlus 5T Star Wars Theme/Wallpapers on Any OnePlus 5T
Page Contents
Guide to Install OxygenOS on OnePlus Devices using Local Upgrade
The OEM is quite consistent with software updates, but these updates are incremental and could take from a few days to almost weeks, to be available for each and every device worldwide. Well, of course, users are not so keen on waiting for days to try out the new features or to get a more stable experience. If you would like to quickly update your device, then you might have considered the option to manually install OxygenOS on OnePlus devices.
Now, this could be done using a few different ways, the most common of which is to use the inbuilt option in the Settings. To be precise, this option is known as “Local Upgrade“.
Advertisement
Before you go ahead, there are a few things/requirements that you should first run down through.
- Your OnePlus device must be completely stock. Which means, neither it should have a custom recovery and nor should it be rooted.
- Always download the OxygenOS full ROM/OTA zip specified for your device. We often provide direct links to the firmware in our device-specific posts.
- It is strongly advised to take a complete backup of your personal data before you manually install OxygenOS on OnePlus devices using Local Upgrade.
- Also, charge your Android phone to at least 50-60% battery level to avoid any disruptions during the update process.
Once you have gone through the above list, head down below to the instructions.
Download OxygenOS Full ROM & Open Beta ZIP
Steps to Install OxygenOS using Local Upgrade
- Download the incremental OTA zip or Full ROM zip for your OnePlus device.
- Connect your Android phone to the PC using the USB cable.
- Once connected, swipe down the notification bar and enable the ‘Transfer files’ option.
- Copy the full ROM/OTA package to the root of the internal storage. By “root”, we mean outside all the folders.
- When copied, disconnect your OnePlus device from the PC.
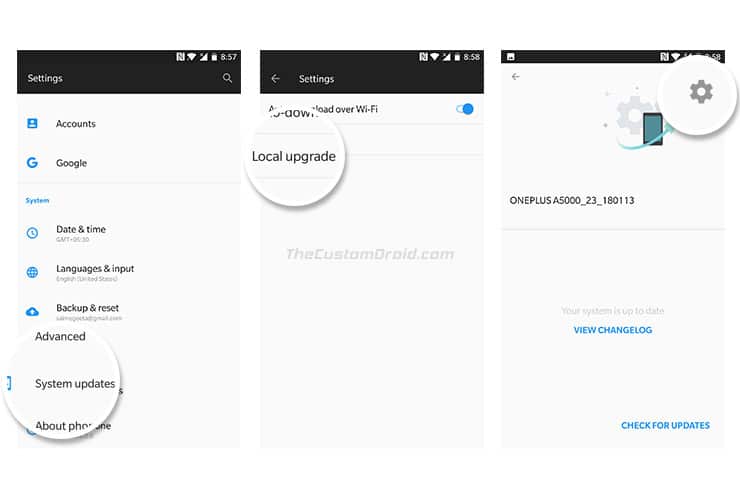
- Now, go to the app drawer and launch ‘Settings‘.

- Scroll down to the bottom and select ‘System updates‘.
- Press the cog (gear-style) icon on the top-right of the screen.
- Select the ‘Local Upgrade‘ option.

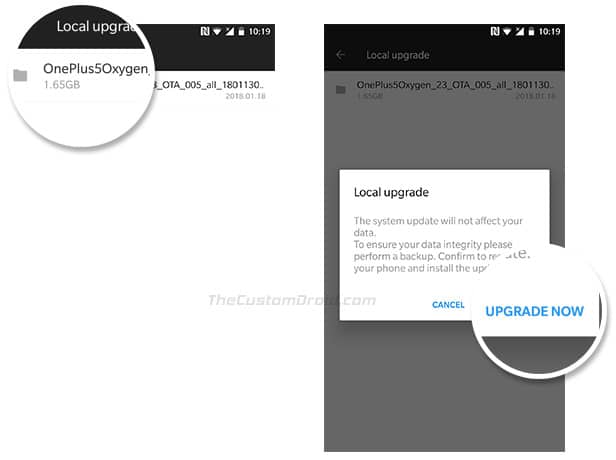
- The system will automatically fetch the update zip.
- Finally, to install OxygenOS on OnePlus devices, tap on the filename and select ‘UPGRADE NOW’ when prompted.
As soon as you do that, the installation process will begin. During this, your OnePlus device will boot into the stock recovery and flash the update package. Finally, when everything’s complete, your device will reboot.
Your Android device should now be running the updated OxygenOS. Go to Settings -> System -> About phone to confirm that the specific OOS version was installed correctly. So there you go, you have just been able to install OxygenOS using Local Upgrade on your OnePlus device. If you have any doubts regarding the process, kindly leave a comment below.