An OTA update has arrived, but you cannot install it because your Android device is rooted? Well, that’s a known downside of rooting Android. In this guide, you will learn how to install OTA updates on rooted Android devices using Magisk. By using the method provided in this guide, you will also be able to retain root and TWRP after installing the OTA update. Before we get any further, let us take a quick look at what OTA updates are and how they work.
Advertisement
Page Contents
What is an OTA Update?
An OTA Update a.k.a an Over-the-Air Update is a wireless method of receiving and installing updates to an Android device’s software.
It is remotely pushed by the device manufacturer (Also known as the ‘OEM’) and is the easiest and most effective way to update an Android device’s software to the latest available version. Once an OTA update arrives, it is either automatically installed or prompts the user to manually download and install it.
So, how does one install an OTA update on a rooted Android device? You will know more about it in the next section. Read ahead.
Advertisement
Why You Can’t Install OTA Updates on Rooted Android Devices Automatically?
Rooting an Android device is great, it gives the user tremendous control over the device’s software and allows making any sort of modifications to it. However, it comes with its own drawbacks. The biggest one is losing the ability to take automatic OTA (over-the-air) updates. And users (Generally who are new to the scene) often tend to overlook this factor when they root their Android device.
In Android 5.0 and above, Google introduced the concept of block-based OTAs. This new mechanism does certain pre-OTA block checks to verify the integrity of the device’s software. In layman terms, once the installation begins, the device partitions (like system, boot, vendor, dtbo, etc) are checked for modifications like Root, TWRP, etc. And if detected, the OTA update will fail to install.
Magisk Root, A/B Partitions, and OTA Updates
But thanks to Magisk, you can easily install OTA updates on rooted Android devices without losing root. For those who don’t know, Magisk is a Universal Systemless Interface that allows you to make modifications to your Android device’s software systemless-ly, that is, without altering the /system partition.
Not just that, it has also developed to be the most prominent modern-day rooting solution for Android using MagiskSU. Want to know more about how it came into existence? Then there’s no better way but to hear out the story directly from its creator – topjohnwu.
The developer devised two different methods to install Magisk and root Android devices:
- The first method follows the traditional process of installing a custom recovery (TWRP, OrangeFox, etc) and then using it to flash the Magisk installer zip (root package). But since you will install a custom recovery during this method, it makes it even harder to take OTA updates. So, to regain the ability to take automatic OTA updates or install them manually, you would require to first uninstall/remove root and other modifications applied to the software. And further, restore the stock Android recovery on your device.
- The second method was introduced when Google first released the Google Pixel devices in 2016. These devices came with dual A/B partition system to support seamless updates and removed the recovery partition from the devices completely. So, the first method failed rigorously. This new method involves patching the stock boot image using Magisk and then flashing the patched boot image via Fastboot.
The best part about rooting your Android device with Magisk is that it gives you the ability to install OTA updates easily. So, follow the instructions below on how to do it.
Note: If you’re upgrading from Android 10 to Android 11, make sure that you update to Magisk 21.0 or the latest Magisk Canary release. v20.4 and lower do not support Android 11.
How to Install OTA Updates on Rooted Android Devices?
Now, since most new OEM Android devices come with the A/B partition scheme, OTA updates are seamlessly installed to the inactive slot. When you root using Magisk, it is only installed to the currently active slot of your Android device. And thus, the inactive slot/partitions stay untouched.
When an OTA arrives, you can simply restore the stock boot image from within Magisk Manager, then install the OTA update to the inactive slot. And finally, right before you reboot your phone, you can install Magisk to the inactive slot to preserve root after the update.
Advertisement
Still, sounds a bit confusing? Don’t worry, the instructions below will take you through the complete process in detail. For your convenience, we have split the instructions into 5 different steps so that you can understand exactly what you’re doing.
Step 1: Disable Automatic System Updates in Settings
In Android 8.0 Oreo (and above), Google introduced a new automatic updates policy that downloads and installs OTA updates as soon as they are available.
Although this is great for an average Android user, but not for those who have rooted their devices. In order to update your rooted Android phone, you must first prevent the system from automatically installing updates without your acknowledgment.
Simply follow the steps below to disable Automatic System Updates in Android:
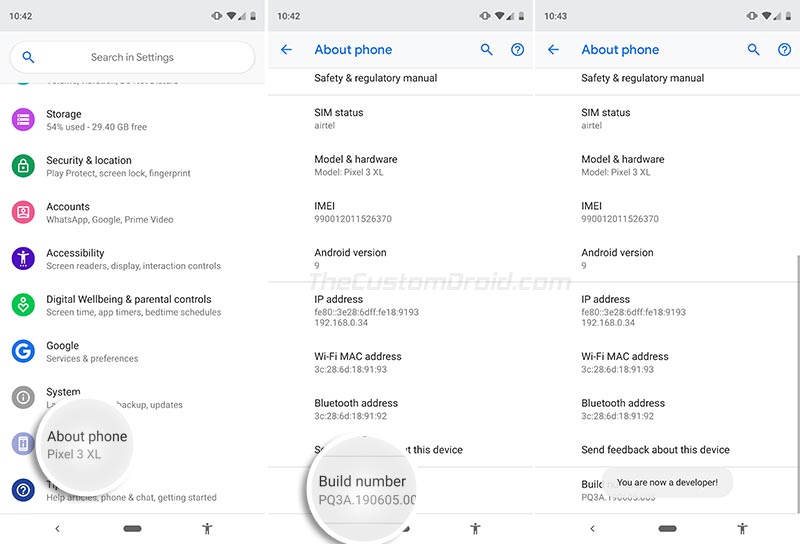
- Go to the Settings menu on your Android device.
- Navigate through the settings and select the About phone menu.
- Scroll down to the bottom and find the Build number section.
- Note: In the case of some OEM devices, the Build Number section could be nested further in the Settings menu. For example, in Samsung Galaxy devices, you will need to go to Settings → About phone → Software information.
- Now, continuously tap on the ‘Build number’ section for five (5) times to enable ‘Developer options‘ on your device.
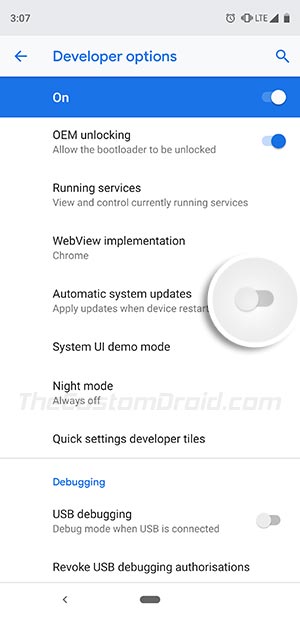
- Once enabled, go to Settings → System → Developer options.
- Scroll down and turn off the Automatic system updates toggle.
Step 2: Restore Stock Boot Image When an OTA is Available
Now your Android device is rooted and an OTA update notification has arrived. When an OTA update is available, you will need to restore the stock boot image (and dtbo, if applicable) and uninstall Magisk from the current slot.
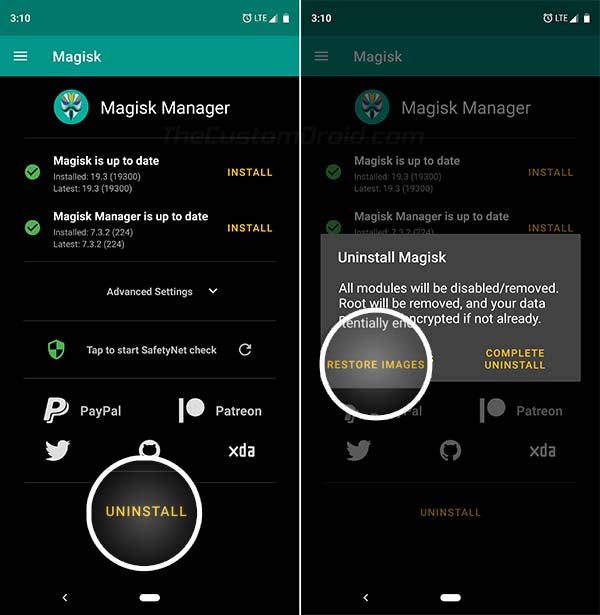
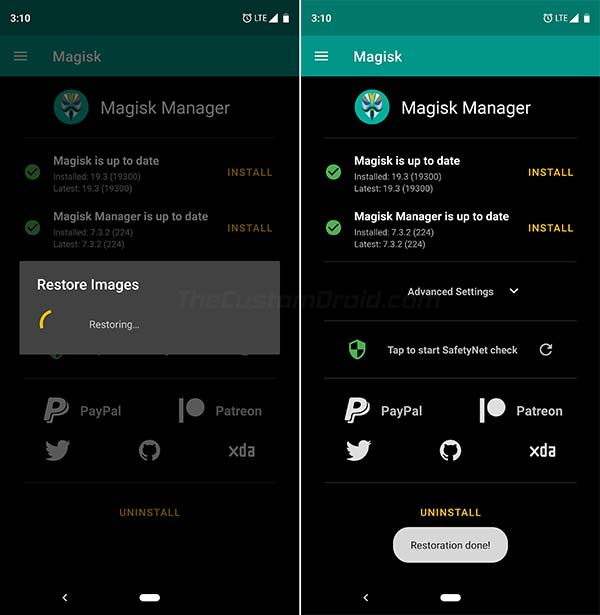
To do so, go to the app drawer and launch the ‘Magisk Manager‘ app. Then tap on the UNINSTALL button and select the RESTORE IMAGES option. You should now see the “Restoration done!” message on the screen.
Advertisement
Do not! Absolutely do not reboot your phone now, or else Magisk will be uninstalled completely.
Step 3: Install the OTA Update on your Rooted Android Device
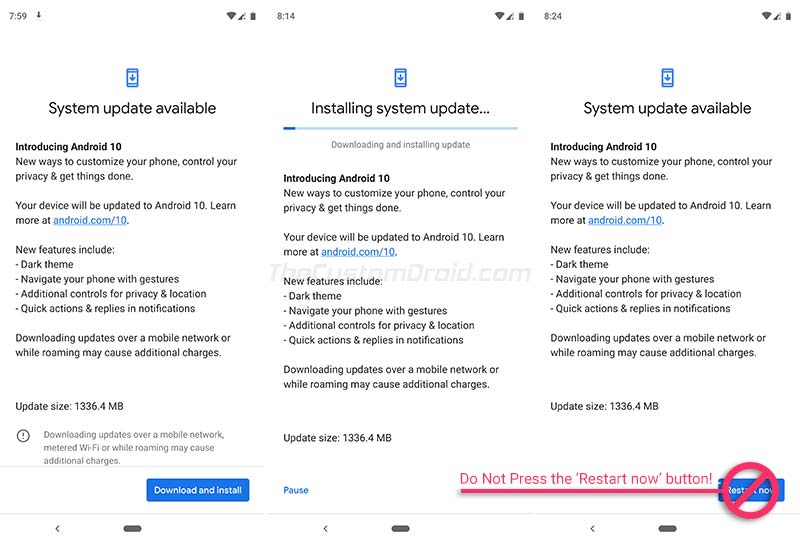
Now, with the stock boot image restored, you can freely install the OTA update on your rooted Android device. Simply go to the device Settings → System → System update, and press the ‘Download and Install‘ button.
Once the installation finishes, you shall be prompted to reboot your phone. DO NOT REBOOT YOUR DEVICE YET! Simply move ahead to the next step.
Step 4 [Optional]: Retain TWRP Recovery after OTA Installation
This is an optional step and only to followed if you installed Magisk using TWRP recovery (Method 1). It will allow you to retain TWRP recovery after installing the OTA update.
For this, you will need to download and install “TWRP A/B Retention Script” (by XDA Recognized Developer osm0sis) from within Magisk Manager. To do so, follow the steps below:
Advertisement
- Go to the app drawer and launch the Magisk Manager app.
- Tap on the menu icon (3-horizontal lines) on the top-left of the app’s window.
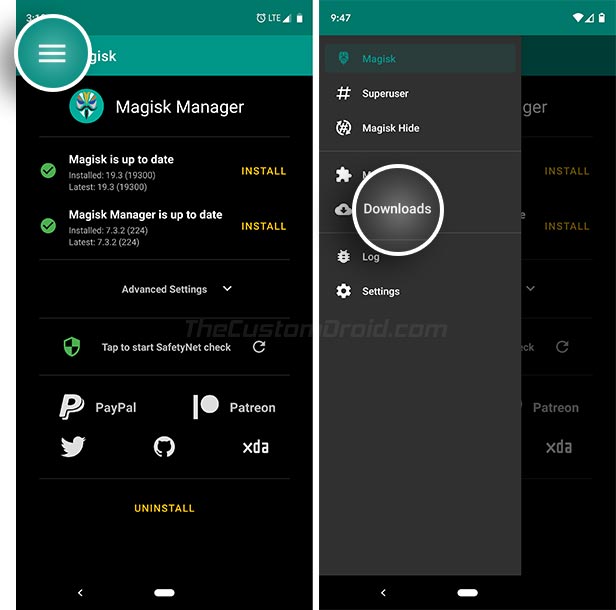
- Select ‘Downloads‘.
- Now search the modules repository for “TWRP A/B Retention Script“.
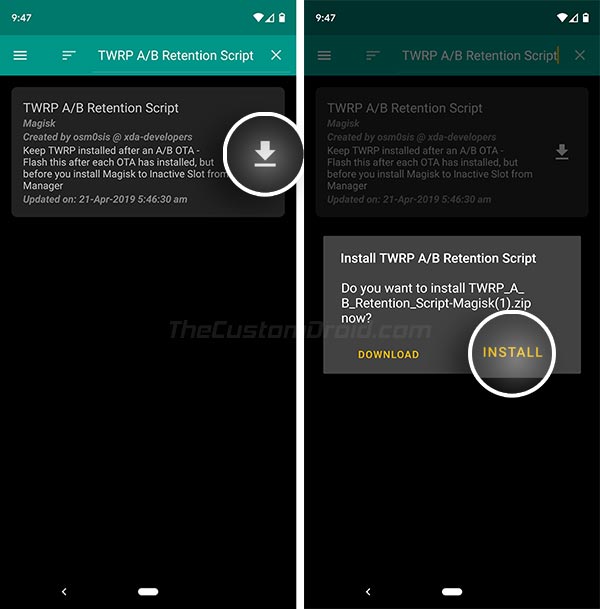
- Next, tap on the download icon and select the Install option.
The script should now be installed on your phone. There’s nothing more you’d need to do for this now. The script will do its job and preserve TWRP after the OTA installation finishes.
Step 5: Preserve Magisk Root after OTA Installation
The final step to install Magisk to the inactive slot. This will preserve root after the OTA installation is finished and the device is rebooted into the updated OS.
- Open Magisk Manager.
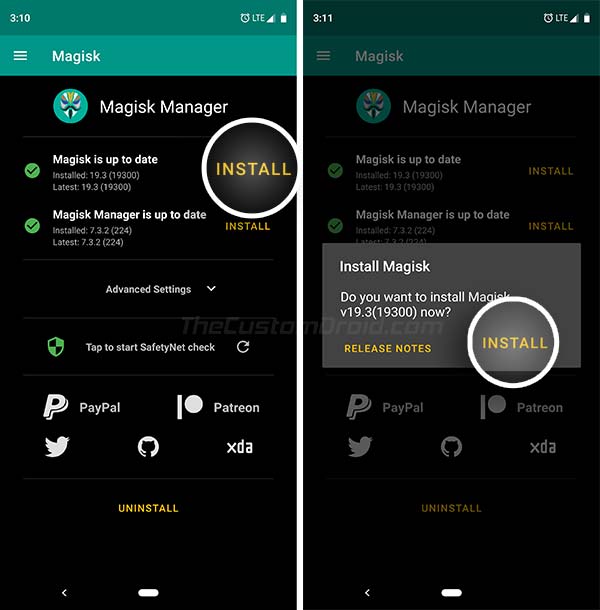
- Tap on the ‘INSTALL‘ button and select the ‘INSTALL‘ option.
- Select ‘Install to Inactive Slot (After OTA)‘ when prompted to choose the installation method.
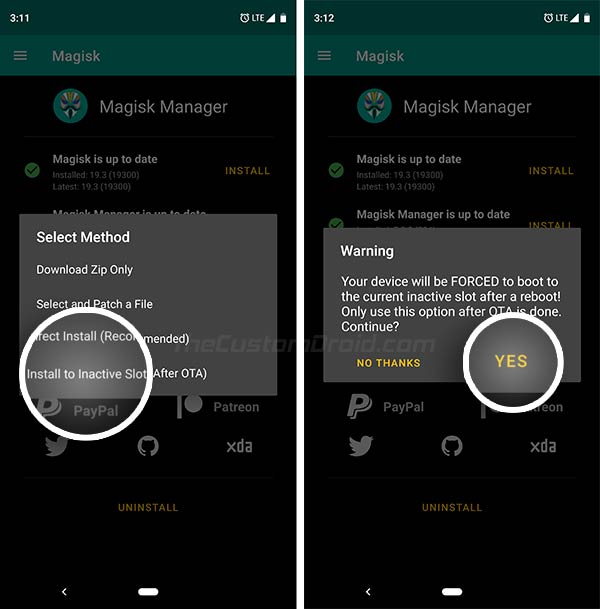
- Finally, tap on ‘YES‘ to confirm when the warning message appears on the screen.
- Magisk will now be installed on the inactive slot.
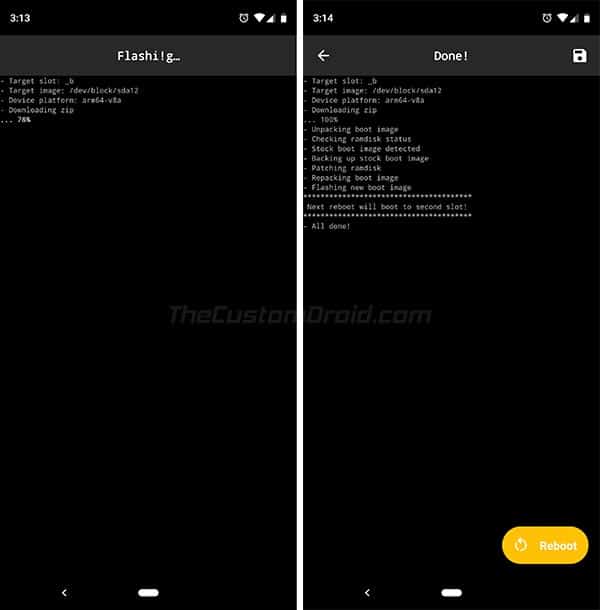
- Once the process finishes, tap on the ‘Reboot‘ button.
Magisk Manager will now force-switch your Android device to the inactive slot where the OTA update was installed. This will help prevent any post-OTA verifications that the system might have carried.
That’s it! You have just successfully installed an OTA update on your Android device rooted with Magisk. So when the next time an OTA update arrives, you can follow the same instructions to upgrade your device, and that too without losing root.
If you have any questions regarding the instructions/procedure listed here, feel free to let us know. We shall try to help you to the best of our knowledge. Make sure that you mention your device’s name (model number if applicable) and the software build number installed. This will allow us to help you quickly and more efficiently.
(Source: Official Magisk documentation)
Comments 102 Comments
Comments are moderated, and published only if they are relevant to the topic and add value in a constructive way. If you disagree with something, please be polite and respectful. We suggest you read our comment policy before commenting.
Hello sir, I have a Google pixel 4 XL with Magisk installed and rooted. It’s currently running Android 12 and I want to upgrade to Android 13, will your method work?
Malik, the method should work without any problems.
Hello! Just wanted to say thanks for posting this, step by step. Very helpful!
Does this method work even if you have decrypted the phone through TWRP
Yes, it should. Encryption should not have any effect on the installation. If your device already has encryption disabled, Magisk will obey that and keep the flag disabled.
Hey, so I have a rooted OnePlus 7 that is running oxygenos 10.3.8 I recently got the android 11 update in settings app. Will this method work for me to go from 10.3.8 to 11?
Yes, Aryan. The core method stays the same regardless if it’s a minor (monthly security update) or a major Android version upgrade.
Hi Dhananjay! How are you? I need your advice again. Look, after the major update in android 11, is the first time that I can’t restore the stock image in order to apply the February update in EU Rom via OTA. A message says that this image doesn’t exist! I flashed again all the Rom (except data…) according your guide, I rooted again flashing the patched img but I got the same message again. I can’t get the update. I must wait to find the new fastboot build to flash it and to reroot the phone with the new patched img. Have you any other solution?
Fanis, good to see you here again.
Well, that’s really a strange issue. Someone else with the OnePlus 8 reported something similar as well. I am not entirely sure of the cause. The only time Magisk doesn’t take a backup if the
/bootpartition is modified in any way.Anyways, I would suggest doing a full upgrade using the Fastboot ROM. It’s the Mi A3 EU variant that you have, am I right?
It’s ok now my friend and thanks for your quick response! I see that your site has been better than ever! At last I did all from the beginning. I uninstalled all the modules, then the Magisk and in the end I flashed all from the beginning and I rooted it again. Then I restored (yes!) the stock image and I applied the February OTA update. I reinstalled all the modules and so on…
My pleasure, Fanis. And thanks for the appreciation. I am trying to make it better every passing day.
I still couldn’t figure out why exactly Magisk wouldn’t create a backup of the stock boot image. The only time it might fail is if the
/bootpartition was modified in any way. Anyways, good to know that you were able to resolve it.Thank you for the clarification, but I have a big problem trying to update on my rooted OnePlus 8 Pro. When I click to RESTORE IMAGES in Magisk Manager I get the error message “Stock backup does not exist.” So I did a Complete Uninstall in Magisk Manager and my phone was stuck in a bootloop and would not reboot. The only way I could get it to reboot was to go in the fastboot mode and use the platform tools to install root the phone again.
I then did a factory reset and again rooted the phone per your instructions. However, the same problem recurred: I again received the “Stock backup does not exist” message and if I uninstall Magisk the phone won’t boot up. So I am stuck with either a rooted phone that I can’t update. Any suggestions?
Hi again, Jason. That’s odd and I personally have never experienced it in years of rooting. I just updated my OnePlus 8 to OOS 11.0.4.4 using the very same method without any hiccups.
Anyways, please let me know the OxygenOS version that’s currently installed on your OnePlus 8 Pro. Also, let me know if it’s the Global, European, or Indian variant.
Apparently, somehow the backup boot image Magisk uses was missing. That’s why I have never been able to successfully apply an OTA without losing root which was no big deal since it is easy to re-root. However, this was the first time the phone went into a bootloop after uninstalling Magisk.
Fortunately, I was able to fix the problem thanks to your guide on how to restore OnePlus 8 Pro back to stock OxygenOS. I used the fastboot command to install the stock boot imagine for 11.0.2.2 global. Now my phone was able to reboot so I used Magisk to root again. After that I was finally able to successfully use this guide since the RESTORE IMAGE in Magisk was working. Don’t know what I would do without your guides. Thanks again.
That’s fantastic. It’s really good to know that my guides are helpful. Kudos, Jason!
Thanks for your reply, but I am still not clear if your tutorial will work for incremental updates. The Oxygen Updater app states that “if you have an unlocked bootloader, then you should always pick the full update as update method.” Oxygen OS 11.0.4.4 global is ready as an OTA download, but since it is only incremental and not full update I was concerned that I would lose root if downloaded and installed it using your method.
Okay. Let me try and break it down. There are two things you could do in the case of OnePlus when it comes to Step #3 of this tutorial:
1) Take the OTA via the in-built update mechanism. If your phone’s bootloader is unlocked and/or is rooted, the device will always download full OTA updates.
2) Download the incremental/full OTA and install it via the Local Upgrade option.
I suppose you’re downloading the OTA via the Oxygen Updater app. This means you have the choice to download either the incremental or the full OTA package. And you could use any of the two.
The app suggests the full update because it’s the safest option. Why? I answered that in my previous reply to you.
Short answer: Yes, you can do with incremental updates, given that you have not mounted or altered the /system or /vendor partitions manually.
My suggestion: Use the full OTA update.
In either case, you will not lose root. Just make sure that you DO NOT REBOOT the phone after installing the OTA until you have installed Magisk to the inactive slot.
Thank you for your useful guides. Will your guide to keep root work with an incremental OTA? The Oxygen Updated app states that you should only install a full OTA on rooted devices.
My pleasure, Jason. Yes, that’s exactly what this tutorial is for. Full OTAs do not conduct block-level checks to verify if any device partitions have been modified. And that’s where step #2 comes into play, it restores the stock boot to achieve this.
Hello
Once again I come back to you to inform you that I have just updated my One Plus 8 Pro OTA smartphone to the OxygenOS 11.0.4.4 version. I was alerted by the Oxygen Updater app.
The ZIP file (3.07 GB):
OnePlusProOxygen_15.E.34_OTA_0340_all2102011818.280ce.zip
The update was carried out perfectly by strictly following your tutorial above.
The device is still rooted and is working perfectly fine.
This message is particularly intended for all your readers …
Best regards,
see you soon…
Jean, it’s good to see you sticking around. I am sure it will be useful for OP8 Pro users who visit this page.
Even I updated my OnePlus 8 to OxygenOS 11.0.4.4 yesterday with Magisk and all is working fine.
Hello, I have a magisk rooted One plus 7pro. I have now and rood 10.4…. Until now for the minor updates I applied these steps
1. Disable magisk modules
2. Local update (NO REBOOT)
3. Go to magisk and install it to the Inactive Slot and..
4..install Twrp A/B
5. REBOOT
With this method I never patched anything and worked perfectly., I wonder if it’s going to work with Android 11 update as well or do I have to do anything extra?
Thank you in advance
=)
Yes, it should work, as long as you’re using Magisk v21 or above and not an older version of Magisk.
for Dhananjay Bhardwaj
Good evening
The OTA update went perfectly by following your tutorial step by step above.
Indeed, updating the image is absolutely not necessary.
You just have to be careful not to restart the smartphone before the end of the various steps …
The new system OxygenOS version is: 11.0.3.3IN11BA
Thanks a lot for your help.
Good night.
Best regards.
Good to know it worked and you’re most welcome. These same instructions were also there in the OnePlus 8 series rooting tutorial itself.
Yes, the boot image is only required when rooting and not when updating the software.
And like you said, the device shouldn’t be restarted before Magisk is installed to the inactive slot. Not like restarting after installing the OTA will break anything. It will just boot into the updated software but WITHOUT MAGISK ROOT. So, one will need to re-root again by patching the boot image and all.
@ Dhananjay Bhardwaj
Hello again
Thank you for your quick feedback.
Indeed, I installed Magisk on my One + 8 Pro and my device is therefore rooted.
I was just wondering if the “boot” file already installed and which was used for the upgrade to OxygenOS 2.0.2 should also be updated.
I will therefore follow your tutorial above the comments and the indications that you sent me in your answer and everything should be fine.
Thanks again, best regards.
You’re welcome. The boot image is generally only needed when rooting the phone initially.
When it comes down to OTA updates, Magisk automatically picks up and patches the stock boot image of the software update installed to the inactive slot.
Let me know how it goes.
Hello and Happy New Year to everyone
An update to Oxygen 3.0.3 has just been offered to me with the Oxygen Updater application: version 15.E.33_0TA_0330_all_2012102330
Please tell me in advance if the “Image” file that is currently installed on the One Plus 8 Pro (rooted with Magisk 21.2 and Manager 8.0.5 installed) can be used or if a new image needs to be extracted from the Zip file of OTA?
Best regards
A happy new year to you too!
The boot image must always be extracted from the existing firmware (that is 11.0.3.3 in your case right now).
My question: Why do you need to extract the boot image at all? If you have Magisk installed, you can install the update without having to go through that trouble at all.
Here’s what you should do to achieve this:
1) Go to Magisk Manager > Uninstall and select ‘Restore Images’
2) Install the OOS 11.0.3.3 update via the Local Upgrade option (Settings > System updates and press the cogwheel icon)
3) After the installation finishes, it will prompt you to reboot the phone (DO NOT REBOOT YET)
4) Go back to Magisk Manager, press ‘Install’ and select ‘Install to Inactive Slot’
Once this is done, reboot the phone. Your OnePlus 8 Pro should boot into the updated OxygenOS 11.0.3.3 software with Magisk root still present.
Hello…hoping to get some insight. I’ve been rooted since November and that is also the last Google update I took on my Pixel 3. Suddenly today it took the Dec 5 update (I’m January!) and now Magisk modules are gone and appears not rooted. Boot loader is unlocked. I have options to install Magisk and the Manager but no changes if download and apply patch
That’s really odd. I was able to successfully update my P3XL from December 2020 to January 2021 patch without any problems. So it seems like your device just ran into an unusual problem this time.
I would suggest downloading the December 2020 factory image from here, extract the boot image from it, patch it with Magisk v21.2 (now available on the stable channel) and flash the resultant patched boot via the fastboot flash boot command.
That worked thank you. Patched Boot.img and loaded via fastboot flash boot (full path to file name and then fastboot reboot as you suggested and had it all back. Thanks again.
Good to know that it worked, Perry. You’re welcome!
Hey mate, I do not have any sort of root installed but I do have a unlocked bootloader and twrp installed (based on the guide on your website). How can I install OTA updates with only that.
BTW.. Your articles are written on point and also helped me gain a lot of knowledge in regard to rooting of android and the processes involved..
Hi Adithya, may I know the device in question? The process depends on the device configuration. And are you certain that you do not have Magisk installed on your device?
Thank you for such kind words, my friend. These mean a lot.
The device in question is an Mi A3
Hi again, Adithya. You could flash the latest recovery ROM package to your Mi A3 directly via TWRP. Right after flashing that, you will also need to flash the TWRP installer ZIP and Magisk ZIP (if you want to root as well) files and then finally reboot the phone.
In doing so, you will have the updated software and retain TWRP + root.
This guide is aimed at users who already have rooted their phone with Magisk. Since it’s not the case here, you could do as I suggested above.
EDIT: I do maintain a repository for all Mi A3 software updates. You can download the latest Recovery-flashable ROM from there. The links are fetched directly from Xiaomi’s Firmware Updater Servers.
Good evening
I need your advice again …
I think I have to go back to the factory settings for my 1 + P8 because of a problem that I cannot solve: I can no longer use the TITANIUM application after various attempts to restore to working order: uninstall, reinstall, restore the application with Dr Fone …
This application was still working yesterday but I have probably done something that is not correct. When I launch the app, it closes immediately. It is not one of the applications that have root access with Magisik.
I would just like to know how to do this: do a “factory” install or reflash the current version of Oxygen OS 11.0.2.2 with your guide listed above?
Thank you for your advice.
Hi Jean, here’s the link to the guide that will allow you to restore your OnePlus 8 Pro back to the stock OxygenOS firmware.
Hi, is this method gonna work for a Xiaomi Redmi Note 9 Pro? I can’t find any infos about that.
Btw, great blog!
I am not sure if the Note 9 Pro supports A/B partition system. This tutorial supports devices that have A/B scheme. You could confirm that using the instructions here.
Do you have TWRP installed on your Note 9 Pro or is it just rooted with Magisk using the patched boot method?
And thank you for the kind words.
Can confirm, if someone comes here wondering, that the Xiaomi Redmi Note 9 Pro does not indeed support A/B partitions.
Thanks for confirming, Alex. In case you have TWRP installed, you can just flash the latest MIUI recovery ROM through it, followed by the Magisk installer ZIP package. This should allow you to update your Redmi Note 9 Pro to the latest software/build version while preserving root.
Hello
I have just performed the OTA update (reported yesterday by the “Oxygen Updater application) for the Oxygen OS 11.0.2.2.IN11BA version by following your tutorial above (by not following point n ° 4 since I does not have TWRP.
Everything went perfectly well and the 1+ P8 is fully operational with Magisk 211 and Manager 8.0.3 also working.
Thank you again for your very precious help …
Just saw your latest comment now, Jean. I am glad it worked and your OP8 Pro is now successfully updated to OxygenOS 11.0.2.2 while still rooted with Magisk.
Even I got the update today and got my OnePlus 8 to the latest OOS version.
And, you’re most welcome!
Hey! Thanks for creating this guide… Will this work on a Samsung A315G? Im not sure if it has A/B Partition, so can you check it for me? Thanks so much!
Tommy, you can check if your Galaxy A31 supports A/B (seamless) updates by following the instructions on this page.
Android 11 beta is out now. Will this method still work for Android 11 on a OnePlus 8 Pro? Also, it is my understanding that TWRP Recovery does not work (at least not yet) with Android 11. Therefore, should one not go through the step for retaining TWRP with the Android/Oxygen 11 update?
Hey Jason. It will depend on your current configuration. Android 11 stable/beta is only supported by the latest Magisk canary versions and not by the stable Magisk release. Furthermore, if you’re moving from stable OOS to OOS 11 Beta, I would suggest making a clean install because of the nature of beta software. Like any other Android OEM, OnePlus tends to add its own patches at kernel level, which may or may not work with even Magisk Canary out-of-the-box. So, the choice is up to you. Just make sure that you install and use the latest version of Magisk Canary before you attempt. You can get Magisk Manager Canary from Github.
As for TWRP, yes, the step is completely optional and need not to be followed if you’re not using TWRP in the first place.
I hope this helps.
Hello.
Do this work on a h96 pro plus android tv box? It have android 7.1.1 and it would be nice to get a bigger and better android on the tv box.
My tv box is NOT rooted but i can root it in no time.
Hi Mike. The important part is getting the firmware update, without root if possible.
I did find a few threads on the topic that should be worth going to:
1) FreakTab
2) XDA: 1 & 2
From what I could gather, the TV box is not registered with Google’s CTS, which makes it really hard to get firmware updates.
Hi, I am using redmi k20 and rooted with TWRP. Can I just flash stock recovery.img and install OTA? Will erase my data or unroot the device?
Hi. I would suggest flashing both recovery and boot images. The latter for just in case. Yes, this will unroot the phone, you will need to flash TWRP and Magisk again.
I think it’s best to flash the MIUI recovery ROM of the update via TWRP itself, followed by the vbmeta patcher and Magisk ZIP files. This will preserve both root and TWRP after the update. Take this page as a reference for the files.
Excuse me, i’m still very new to this world😅. So i want to ask about when i am able to reboot (restart now) the update software?
I mean i see nothing about pressing -restart now- through step 1-5, the only restart i see was on step 5 which meant to reinstall the magisk and not to update the software
Hi Malvin. The software is installed right after step #3. If you restart right after that, your phone will be updated, but you will lose root.
That’s why you need to follow through step #5, flash Magisk to the inactive slot (where the new software update has been installed), and only then reboot the phone.
Hey. Thanks for your guides! They’ve been really helpful.
I just got a new phone and I’ve been reading your guides in advance before rooting. Can I still get OTAs with the second method (not using TWRP) provided in this guide with Xiaomi Redmi Note 8 Pro? Guides on other sites all either state that I need TWRP or won’t be able to get OTAs at all. It operates on Android 9 Pie and MIUI 11. I’d much rather use the non-TWRP method because it seems easier and more convenient but I’m not sure if I can. Sorry if the question is dumb, I’m not too good with software
I am happy that my guides have been helpful!
No, the question makes absolute sense. The thing is, that the Redmi Note 8 Pro doesn’t have a second slot to install the OTA or Magisk to, after updating. That’s why it will not work on the phone.
The good thing with Xiaomi is that you can flash the latest OTA updates directly via TWRP. For devices with an A-only system, TWRP is a very good tool to have. You can use it to take backups of the complete OS, use it to flash custom ROMs (if you plan to try them), and much more.
If you have any more questions regarding the phone or related things, please feel free to comment.
Thank you for the quick response.
You said that you can flash new OTAs directly via TWRP. Does that mean I won’t have to unroot/soft reset to get a new OTA? Or do I have to unroot first? If yes, is unrooting and then rooting again a big hassle to do or is it simpler (for example I hear SuperSU has a simple unroot/reroot option)? And should I use Magisk for rooting?
Also am I supposed to transfer complete OS backups to my computer or something? And about custom ROMs, what kind of features are available with those?
Sorry if that’s a lot of questions at the same time, I’m new to this kind of stuff.
Hi again J. I can understand it could be a lot of things to consume at once.
By install OTAs, I meant manually installing the full ROM/firmware file. Once an update is released, you can grab its full ROM file and flash it via TWRP.
There will be no need to unroot. But when you flash the ROM package, root will be gone. In that case, every time you flash an update (full ROM), simply flash the latest Magisk installer ZIP file right after that and finally reboot the phone.
In doing so, you will have the update installed and root still preserved. Don’t use SuperSU at all. It has been depreciated and only good for rooting older Android phones. Magisk is what you should opt for.
Once you have TWRP installed, it makes sense to take a complete backup of the OS via TWRP itself and transfer it to your PC. This backup will come in handy if you want to revert from a custom ROM back to stock ROM.
My personal suggestion would be to try this stuff first and only then move on to custom ROMs. If not, it will all be confusing to take at once, like I said earlier.
If you have any more questions, please feel free to let me know.
Hi, this method works only for ota or does it work also for full update? I want to switch from stable oxygenos 10.3.2 to open beta 6 (oneplus 6t device) and I have to install the full update of open beta 6, I don’t think it works with incremental update. Will this method work in this case? Thank you.
Hi MBogdan. Switching from Stable to Open Beta would require you to flash the full OTA file via the local upgrade option in the settings menu. Theoretically, it should work.
The only change you have to do while following the steps in this guide is during Step #3. When at that step, simply flash the Open Beta full update file via the Local Upgrade option and then DO NOT reboot the phone. Then follow the rest of the instructions in step #5 and you should be good.
OK – except for when I to to Settings to install the update, it only gives me a “Restart now” option – no “Download and install”….
Hi Scot, it means that the update was automatically downloaded and installed. That’s why I mentioned disabling automatic updates in Step #1. In your case, I believe the update was downloaded and installed even before you started following the instructions.
Will this method work for me
I rooted my device using the rooting tool given by XDA DEVELOPERS which automatically installs twrp and magisk.
Please help me can I install OTA updates as in the second method without any flashing
**CAN MY MAGISK MANAGER RESTORE THE BOOT IMAGE**
please help me saying whether my MAGISK MANAGER taken a backup
So I can install OTA updates by restoring the images
Hi Jaya Krishna. I personally do not trust one-click root tools, because when you use them, you practically have not idea what it actually does on the backend. And so, you will have not idea how things work when it comes to rooting, etc.
The only way to know if it works or not is by trying to follow the OTA update method, during which you will try restoring the stock boot image. If it doesn’t work, Magisk will notify you that it doesn’t have a backup of the boot image.
My personal suggestion would be to restore the stock firmware, which means, install the update manually. And then re-root your phone manually.
If you want, I can cover a full guide for it on the blog.
Thanks for the offer but i know the process.im rooting my Redmi Note 7 by patching the stock boot image so the OTA works perfectly I think but I have a doubt whether this step will work or not
(Select ‘Install to Inactive Slot (After OTA))
As REDMI NOTE 7 doesn’t have a/b partition.please answer me whether the step works or not
And one more thing would you recommend me to UPDATE TO ANDROID 10 or not,as I see there is much security which is even effecting magisk with safety net check and other what would would you recommend stick to 9 or update to Android 10
Hi again, Jaya Krishna. The option will only work on A/B devices. Since the Note 7 doesn’t support that, there’s no other slot for Magisk to install and thus it can’t be used.
If Android 10 is stable enough (which it should be), I think upgrading your phone would be a good idea.
As for Magisk and SafetyNet, it won’t be possible anymore because Google has recently implemented hardware-based attestation for SafetyNet, as opposed to the software-based attestation that Magisk could bypass earlier.
Magisk creator John Wu posted about this on March 11 on Twitter: https://twitter.com/topjohnwu/status/1245956080779198464
Just did everything outlined, double checked myself on each & every step but it bricked my phone!! On re-boot it goes to the fastboot menu & that’s the end of that. I have spent about 16 hours with every fastboot & ADB command, TWRP flash, …. & nothing. I have ordered a new phone but would love to get my original Moto g7 power working
Hi Fred. Sorry that you had to go through such an ordeal. To recover your phone, you have to restore the stock firmware.
There’s a guide on XDA-Developers for this. Please check it out here.
If you need any help with it, please let me know.
Hi, great guide. I have the following problem. My Xiaomi Mi 8 (normal, not lite nor pro) has been recently updated with the latest Miui 11 on Android 10 by OTA. It was a mistake because before i updated it, it was already rooted but i tapped the update option by inertia. I really hate this new version because its too slow in some games so i want to downgrade it.
My problem is that i already rooted it with this updated android with twrp/magisk/smali and i expended a whole day to do it, and if posssible i dont want to do it again, BUT i want to downgrade my Android to the previous version. Is it possibe to “flash” it with the previous rom without loosing twrp/magisk/smali? THanks
Hi Jose. I am afraid, but whenever you flash the stock ROM/firmware, you TWRP/Magisk and any other modifications will be overwritten because the system and boot partitions are overwritten as well.
Now, over to the downgrading part. You will need to make sure that your Android 10 ROM’s rollback index matches with that of Android Pie. On your part, you have to check the former by following the instructions in this post. While you’re there, also give a read to the entire post to understand what the rollback index is and how it works.
On my end, I will download the Android Pie based MIUI ROM and check the rollback index of that.
If the index matches, then downgrading would be possible. If not, then it wouldn’t be possible to downgrade at all.
Thank you! It worked like a charm. I’ve been waiting to receive an ota update to be able to test updating without losing root.. Magisk really is something else.
Hi. Glad you were able to update your rooted phone through the instructions. And indeed, Magisk really is a wonderful tool.
Nice guide. But Google keeps complicating things more and more each day. They swear it’s for a better security, but thats just false; it’s for the control; they don’t want to loose control over the devices and their users, thats why they have never liked ROMs too much.
Security? Bah!. I work for a bank, and the computers that handle databases, private and confidential data, all of them run Red Hat or CentOS with GRUB, if I don’t recall wrong, and the typical Linux boot partition scheme. And as my company, other millions of companies, governments, law forces, armies, spy agencies, cibersecurity companies, etc, etc, demonstrate every day that no “fancy” psichodelic configurations are needed to have the highest standards in cibersecurity. Just follow the standards, dont reinvent the wheel, Google!
What appears clearer and clearer to me is that consumers who want to be free to use their devices as they want, and not being spied, tracked, profiled, etc, need a real Linux phone like those by Librem or Pine. They are still in a too early stage and cant be compared even with middle range mainstream devices, but they are the guys to follow. We should support them and think in buying one of their devices in 2-3 years, when hopefully their hardware will be better and the software will be more polished and adapted to mobile devices.
The load of cr*p that we have to put up with from Google and other software makers is each day more unsupportable. We do need a really free, libre, operating system which doesnt make conscious people’s life harder.
Hi Joao. I really appreciate your response and your thought on the matter.
Yes, Google makes things harder for users who want complete control over their devices by installing ROMs of their choice, gaining root permissions, etc. I wouldn’t personally buy the whole “security” thing either, but we have to abide by it if we want to continue using their platform. I think that’s fair enough.
I also liked how you pointed out about the Linux phones. Would you mind sharing a URL for them? I would love to take a look.
Hi dhananjay, could you help me? I can’t find any root app that could root my phone. My phone is find x, android 9. All of those root app always failed.
Hi Dozer. Please know that one-click root solutions or apps are no more a thing now.
Some users on this XDA thread have actually managed to install TWRP on the phone. It’s a good place to start reading.
Of course, you will need to unlock the bootloader first. If you face any issues, please let me know through the comments.
its ridiculous how they claim my device is LESS secure because its rooted.. yet its perfectly ok for them to make my device even LESS Secure by denying rooted devices security patches…
Hi Christopher. I can understand. But manufacturers and Google can only support official stuff to an extent, that is, unless a user chooses to modify the software (Rooting, TWRP, etc). They cannot support OTA updates on such devices, because they cannot determine the level of modification on a particular device.
That’s where the developer community comes in, and with sophisticated solutions like Magisk, you can now install OTA even on rooted devices. Trust me, I still remember restoring stock boot, recovery, etc images before Magisk came (for OTA updates) and it was damn hectic every month. Magisk has surely made it significantly easy to perform the process without the need for a PC to restore any images.
Hi Dhananjay,
I tried to follow this tutorial to install the December 2019 update on Mi A1 which was rooted with magisk and TWRP installed permanently. But maybe there was a mistake I made, which is downloading the OTA update and installing it automatically as before it was rooted. The result is that the installation of the update failed. Then I tried to do from step 1 to step 3, and when the installation failed again. Then what steps should I take now? Any advice for me? thanks.
Hi Ricky. There’s definitely some modification that you are possibly looking over. If you have TWRP installed, then just head to this post, download the TWRP-flashable zip file of the latest software update and follow the instructions to flash it.
Since you’re using Magisk + TWRP, and Mi A1 already has nice development support, you can always refer to that post for the latest software versions, then download the TWRP flashable zip, and repeat the procedure every month when a new update arrives.
Having a problem updating as well. I followed the rooting guide here: https://www.thecustomdroid.com/install-twrp-recovery-root-xiaomi-mi-a2-a2-lite/
Restore Images succeeds but OTA still fails. The only root apps I’ve got on my phone are Titanium Backup, BusyBox, Trimmer, Root Checker and Magisk. Haven’t done any other system alterations to my knowledge. I don’t need TWRP retention scripts as I’m not installing it permanently anyway.
Could one of the more recent OTAs have broken this process?
Is it possible to just sideload the OTA update if I can’t get this working? Where does Mi A2 Lite download the file to?
Thanks! Love you work!
Hi Andrew. As per the details you have provided, I don’t think any of those apps could trigger a fault with OTA installation.
At this point, I would suggest you flash the update manually. You can do so by downloading the V10.0.15.0 fastboot image from this link and use the “flash all except storage” script to install the firmware. Please make sure that you take a full backup of all your data beforehand.
And yes, sideloading the OTA isn’t possible because the stock recovery on the device doesn’t allow it.
Thanks for the fantastic tutorial, Dhananjay!
Unfortunately I had brain fade after a distraction and missed the “DO NOT REBOOT YOUR DEVICE YET!” instruction. I did patch the boot image, the phone is up on Android 10, everything is fine except I lost root (Magisk). Magisk Manager is installed but when I click to install Magisk I get: Select Method – Download Zip only or Select and Patch a file. I have the magisk_patched.img file on the phone and computer.
Is the solution to connect to computer and fastboot flash magisk_patched.img or what do I need to do?
Thanks in advance…
I did “connect to computer and fastboot flash magisk_patched.img” and now have Magisk working. Sorry to waste anyone’s time!
Hi again, Ken. You didn’t waste anyone’s time. If the magisk_patched.img was of the currently installed firmware, then it’s great!
Hi Ken. Don’t worry, it’s all good since the OTA installed just fine and only root was lost. Since the phone has been updated, you will need to re-patch the stock boot image of the new firmware that you updated to, and then flash the resultant magisk_patched.img file via fastboot.
BTW, please let me know the device name, model number, Android version, and the build number installed on your phone.
Sorry Dhananjay, didn’t look back here earlier.
Pixel 3, Android 10, Build QP1A.191005.007
All is well, but just discovered that phone lost root after a reboot. I see the instructions to preserve root after the OTA installation, will that work after flashing the images?
Sure hope we get TWRP back soon!
Hi again, Ken. By “after flashing the images”, do you mean install the OTA, or flashing the factory image?
Yeah, TWRP lead developer dees_troy is working on it. It’s hard because Android 10 introduced a new implementation of system-as-root with 2-stage-init.
Flashing the factory image. I’ve been doing monthly updates this way for several months on Android 9 and have it down pat!
Don’t stay up all night over this!
In that case, you will need to re-root first using Magisk.
You can use Method 2 in this guide. As for the boot image, you can get by extracting it from the corresponding factory image from here.
Once you have rooted your device again with Magisk, the OTA installation instructions laid above will work again and will allow you to update your phone without losing root.
Just oustanding. You are an appreciated fellow in the world, and rightly so. Thanks much, and keep it up!
Hi. Thank you so much for your appreciation. It means a lot!
Your tutorials are always so helpful! This planet needs more people like you 🙂
Hi GLIBG10B. Thank you for such kind words. I am glad that the tutorial is proving itself helpful for the readers of my blog. Highly appreciate it.
Concise, direct, beautiful. Thanks!!
Do we know whether Android 10 will interfere with this easy method during the next OTA?
Hi Steve. Thanks for the appreciation.
As for your question; since Magisk now fully supports Android 10 (except for A-only devices with System-as-root like Galaxy S10 series, Note 10 series, etc), this method will work without any issues.
For A-only devices with System-as-root, according to developer topjohnwu, the next stable Magisk version will fully support them as well.
Very well written as always Dhananjay. I’m using this method of the last 2 OTA updates and it’s working fine. The only difference is I don’t have TWRP so I skipped step #4.
Hi again, Kevin! Thanks for the kind words. I am glad it proved helpful to you.
I thought it would be good idea to unify the instructions for users who have followed either of the two installation methods (Either flashing the Magisk zip using TWRP, or flashing the patched boot image).
If you see any scope of improvements or have any suggestions, do let me know.
Hey mate running TWRP and Magisk on stock S9+ and this device is only a (A-only partition)? So my question is what should i do as I’m expecting the android 10 update and would love to check if i have received it yet.
Hi Chris. Sadly, for the S9+ and even the S10/Note 10 series, you will have to update manually by flashing the stock firmware using Odin, and then re-root your phone again.