How to Install ViPER4Android on Marshmallow 6.0
We always look forward to boosting our experience on our Android smartphones/tablets, either by installing custom ROMs like Chroma, or even tweaking the framework using Xposed. But there is another factor that […]
We always look forward to boosting our experience on our Android smartphones/tablets, either by installing custom ROMs like Chroma, or even tweaking the framework using Xposed. But there is another factor that highly influences Android users, and it is the audio experience. Today, we are here to help you install ViPER4Android on Marshmallow running Android devices.
— How to Install ViPER4Android on Android 10 and Below
Most of you might be well aware of ViPER4Android – it is a leading audio enhancement tool available. Yes, there are a lot of others including Beats and Dolby, but nothing beats V4A if you have it configured right. Personally, I have been using this mod for over two years now, my phones have changed, their Android version also, but V4A did stick to the app drawer.
Page Contents
Version Information
Here is a little-detailed information about the update as stated on vipersaudio.
Advertisement
Version: FX version 2.5.0.5 (active)
Codename: (FX version) Beautiful
Compiled date: September 1,2016 / September 4,2013 – Official Release
Operating environment: Android 2.3 / 4.0 / 4.1 / 4.2 / 4.3 / 4.4 / 5.0 / 6.0 / 7.0
CPU platforms: ARM (ARM CortexA8 or higher), x86(Atom/i3/i5/i7)
Language: English (US) / Simplified Chinese / Traditional Chinese / more
Now, without any more delay, let us head over on how you can set up ViPER4Android on Marshmallow running device.
Disclaimer
Installing incorrect/incompatible mods on your Android device may leave it non-functional or even soft-brick it. We will not be responsible if anything such happens. If you find yourself locked in such a situation; we are here to help you.
Advertisement
Before You Begin
- To install V4A, you must have a rooted phone. If you haven’t rooted yet, you can check for your device in our Rooting section.
- Take a complete Nandroid of your current ROM setup. So, if something goes unplanned, you can always roll back to the current setup.
- If you have a previous version of V4A installed, kindly uninstall the drivers first, remove the app completely and then only proceed with the instructions.
- Make sure no other audio mods are installed, like AudioFX. If there is, you will need to remove it completely or disable it by. If you have problems doing so, contact us via comments.
- Also, you must have BusyBox installed on your ROM. You can download it from Google Play Store. (You can try other busybox installer apps, but if you face issues while installing V4A drivers, you must install this one.)
- Install a root file manager. We recommend Solid File Explorer.
Steps to Install ViPER4Android on Marshmallow:
- Download ViPER4Android FX (v2.5.0.5): Link
- Extract the downloaded ViPER4Android_FX_v2505.zip and you will get two files – ViPER4Android_FX_v2505_A4.x-A7.x.apk and ViPER4Android_FX_v2505_A7.x_Nougat_IO_test_fix.apk.
- Since we are going to install ViPER4Android on Marshmallow, we will only need the first on.
- If you have downloaded the files to your phone, it’s fine. But if you have done it on your PC, make sure to connect your device to the PC and transfer the ViPER4Android_FX_v2505_A4.x-A7.x.apk to the phone’s storage.
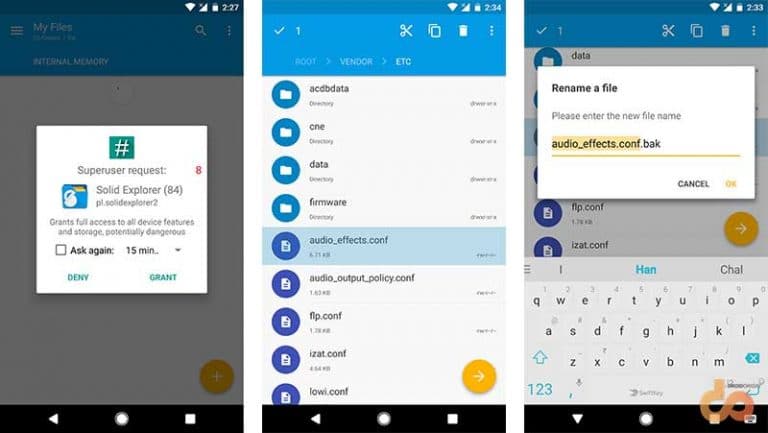
- Now, open the root file manager on your device and grant it root permissions when prompted. Browse to /vendor/etc and rename “audio_effects.conf” to “audio_effects.conf.bak”.

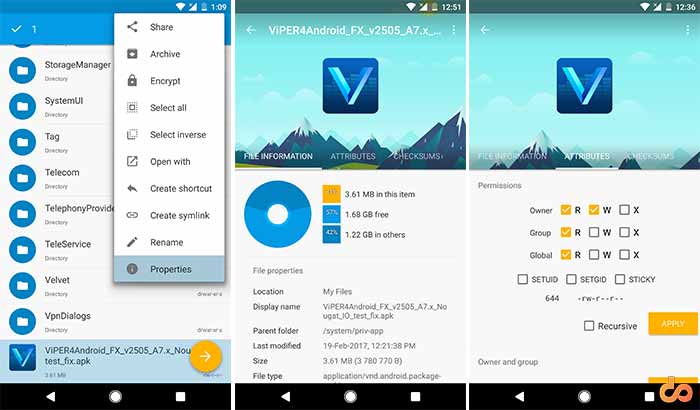
- Using the file manager, move theViPER4Android_FX_v2505_A4.x-A7.x.apk file to /System/priv-app/. Once it is moved, long-press the file, then tap on the 3-dot overflow button on the top-left and select Properties.
- Go to the ATTRIBUTES tab and set the permissions to – rw – r – – r – – and select APPLY.

- Reboot your device.
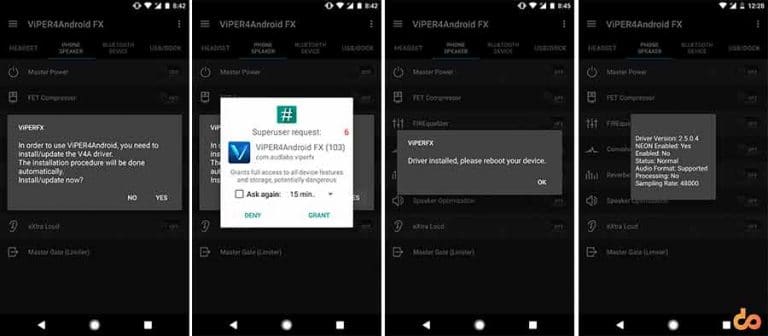
- Go to app drawer and run ViPER4Android FX. When you will run the app for the first time, it will prompt you to install V4A drivers on your device, so tap on Yes. As soon as you tap, you will have to grant root permissions, so choose GRANT.

- V4A app will automatically detect the system and install appropriate drivers for the mod to work properly, and upon completion, the following message will be displayed: ‘Driver installed, please reboot your device’. And now as advised, reboot your phone/tablet (I hope you know how to do that!).
- When the device has rebooted, again launch ViPER4Android FX app.
- Tap on the 3-dot menu button on the top-right of the app, and select Driver Status. It should display Status: Normal.
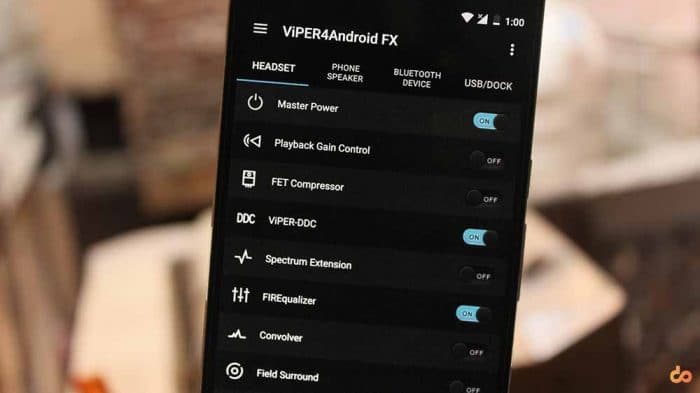
Start using ViPER4Android now! Tweak the settings to best match your phone and output device. Are you using specific profiles for your phone? Post them below and share it with other users. We will definitely add the list to this article. Visit the Xposed XDA thread for more information.
Advertisement
Advertisement
Troubleshooting
If your driver installation has failed, then there could be few reasons behind it. Follow the simple steps below and check if anything helps.
Advertisement
- Getting “Driver instal failed: I/O error, please reboot and try again”? Then read step #5.
- Uninstall the current busybox and switch to a different app to install busybox on your Android.
- The most reliable and widely used method to root and manage permissions is SuperSU. If you’re using any other root method, uninstall that and opt for SuperSU.
- Driver installation was successful, but V4A is still not working? The most common reason behind this is that your device may have other sound mods or tweaks installed. Disable them and completely remove them if possible.
- On some devices, you may require to change your SELinux status from “Enforcing” to “Permissive”. You can do that by using the SELinux Swith.
- If nothing above has worked for you, then you may try switching to a different ROM as your last resort.
- If you still have problems, comment below and don’t forget to mention your device model, ROM, and Android version.
Are you now enjoying the superior sound quality of your device? Share this article on your social profiles and let others know about it too.
Having problems with installation and setup of V4A, comment right away!
