How to Flash Custom ROM on Android
Flashing a custom ROM on Android is an emerging trend these days, that helps users to expand their experience over this powerful and amazing platform. I have been using custom ROMs ever […]
Flashing a custom ROM on Android is an emerging trend these days, that helps users to expand their experience over this powerful and amazing platform. I have been using custom ROMs ever since I bought my first Android (during 2011) when TWRP didn’t even see the daylight. I remember banging my head, reading several threads for my device, on how to flash custom ROM. It seems like a child’s play now, but back then, even when I was a noob, things were messy.
Advertisement
The same way, I believe, we get thousands of new Android users who join the Android custom team, of which for most of the general crowd, flashing a custom ROM is a blunder and a totally new concept. If you are one of them, don’t feel sad about it at all. As they say – “We are imperfect in ways that we can’t see“.

We are going to help you on how to flash custom ROMs on your Android. Irrespective of the manufacturer or version, flashing custom ROMs follow the same procedure overall. We will take TWRP into consideration, which is a major custom recovery available, and everyone seems to use it.
Advertisement
If you still haven’t chosen a custom ROM, you can find one for your device at XDA-Developers forum. And once you have, the next thing you will need is TWRP installed on your Android, you can search for your device specific guide here.
I have a Nexus 6P, and I am going to use Chroma ROM for demonstration. Now without any delay, lets head over to the instructions.
How to Flash Custom ROM
It’s easy, flashing a custom ROM via TWRP and could be done within a matter of minutes.
- First, download what you are going to flash – a custom ROM zip and GApps zip. GApps are provided separately in most instances, but some known ROMs like Cataclysm include them by-default. In my own case, GApps have to be flashed separately and I have grabbed them from OpenGApps.org.
- Now, it is necessary to transfer your ROM and GApps zip files to your device’s storage, until and unless you are going to sideload your ROM. So, connect your phone or tablet to the PC via USB cable, in MTP or USB Storage mode, whichever is available and supported.
- Its time to boot into recovery mode, and we all tend to do this by pressing the hardware-key combination meant for our device. For in my case, with the Nexus 6P, it could be done by pressing the Volume Down and Power key to enter bootloader and finally selecting Recovery mode from there. If you don’t know the right combo for your device, you can always use the following command in CMD or Terminal window, making sure that your phone is connected to the PC and has USB debugging enabled.
adb reboot recovery
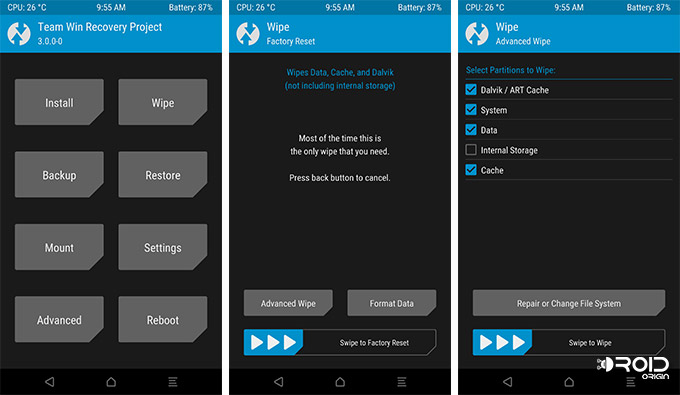
- Once the device has booted into TWRP recovery mode, you will see the main screen with several options.
 We will first wipe the current ROM completely. How? By wiping some specific partitions. Go to Wipe > Advanced Wipe. Now, check the following options displayed on the screen:
- Dalvik/ART Cache
- System
- Data
- Cache
- You will see “Swipe to Wipe” on the bottom of the screen, just swipe the button. It will take a few seconds to complete, and after that, just go back to the main TWRP screen.
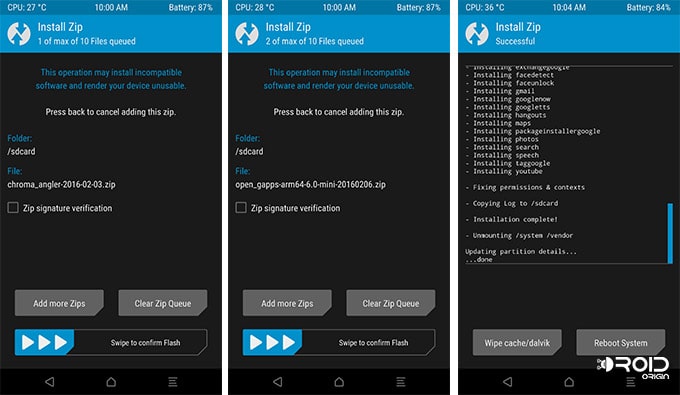
- Time for ROM installation now! Pretty simple, just tap on Install.
- Browse your internal/external storage and navigate to the location where you have copied the zip files in step #2. First, tap on the ROM zip file (e.g. chroma_angler-2016-02-03.zip), and once it has been selected, you will add the GApps to the flashing queue. To do so, tap on Add more Zips. Again, navigate and select the GApps zip file (e.g. open_gapps-arm64-6.0-mini-20160206.zip) now.
 If, in case there are additional mods or essential zips that are needed to be flashed, follow the same method as that of GApps, to add the required flash-able zip(s) to the queue.
 - When both the files have been selected and added successfully to the flash queue, you can swipe the “Swipe to confirm Flash” button. Flashing procedure may take a few minutes, depending upon the size of the ROM, and the number of files.
- When it’s done, you can tap on Reboot System.
Your phone will now reboot into the custom ROM that you chose for your device. The first boot may take a few minutes, or even some more time depending on the size of the custom ROM. So, we have guided you on how you can easily flash custom ROMs on your Android smartphone or tablet. If you feel stuck anywhere, during or even after the process, you can comment below and ask us.
Comments 2 Comments
Hi Dhananjay!
I just flashed my old Xiaomi 3S using this guide with a custom Pixel Experience ROM. But now I have endless booting after reboot (I waited about an hour to boot the phone). 😖 Don’t you know why it happens? I can’t even boot into TWRP recovery mode. I tried to power off my phone and then immediately press and hold the Volume Up button but nothing happened, I also tried boot into Fastboot by the press and hold the Volume Down button, but also nothing happened. 😰
Hi Yaroslav. Please connect the phone to the PC using a USB cable. Then go to ‘Control Panel’ > ‘Device Manager’ on your Windows PC. Check if the device is detected as ‘QUSB_BULK’ or ‘Qualcomm HS-USB QDLoader 9008’.
The fact that it cannot boot into either recovery/fastboot mode implies that it has been hard bricked. And the only way to recover the phone now is by flashing the stock firmware via EDL (Emergency Download Mode).