How to Manually Install One UI 3.0 Update on Galaxy S20 Series – A Complete Guide
Samsung has just started rolling out the stable Android 11-based One UI 3.0 update for the Galaxy S20 series over-the-air. In this guide, we will show you how to download and manually […]
Samsung has just started rolling out the stable Android 11-based One UI 3.0 update for the Galaxy S20 series over-the-air. In this guide, we will show you how to download and manually install the One UI 3.0 update on Galaxy S20 (5G), Galaxy S20+ (5G), and Galaxy S20 Ultra. This could be easily done by flashing the Android 11 firmware using the Odin tool.
Advertisement
There’s no doubt that Samsung has readily improved its software updates support in recent years, especially with major Android version upgrades. Soon after Google released Android 11, Samsung announced the Android 11-based One UI 3.0 beta for the Galaxy S20 series, followed by the Galaxy Note 20.
Page Contents
Samsung Galaxy S20 One UI 3.0 (Android 11) Update
Ever since the commencement of the beta program, the Galaxy S20 series received multiple beta updates, and in quick succession more recently. This simply hinted how hard Samsung was working to release the stable update at the earliest. Well, they did succeed, and the stable Android 11 update for Galaxy S20, S20+, and S20 Ultra are now rolling out to the users over-the-air.
New Features
Being based on Google’s latest mobile OS, the One UI 3.0 update includes all the standard Android 11 features. This includes new conversation notifications, Bubbles chat heads, Device Controls integrated into the Power menu, powerful media controls, one-time permissions, and restricted background permissions for apps to enhance privacy. For more, visit the official website.
Advertisement
With One UI 3.0, Samsung has made some significant design language changes to the complete skin. Home screen, lock screen, quick settings panel, and notification shade are a few key areas where these changes have been made to better highlight their importance.
According to Samsung – “One UI 3 doesn’t just look different – it feels different, too.” and we couldn’t agree more. The visual UI changes in One UI 3.0 have a very positive and deep impact on how users navigate around some of the major areas of the operating system.
Apart from the UI enhancements, One UI 3.0 features significant improvements throughout the OS. For more, check the official announcement on Samsung Newsroom.
Further, the One UI 3.0 update for the Galaxy S20 series also comes with the latest December 2020 security patch as a cherry on top.
The Update is Rolling Out Now
As per the reports from SamMobile (1 & 2), the update is already live in several regions and markets in the US, Korea, Europe, India, and more. It will further expand to other regions in the coming weeks. You can check if the update is available on your phone by going to ‘Settings’ → ‘Software update’ → ‘Download and install’.
The update is rolling out in phases and is heavily dependant on factors like the region, model, and carrier. So, it could take some time before it’s available to everybody. We’re talking about waiting for days, and sometimes often weeks. The wait time could even be longer for those running the One UI 3.0 Beta software.
If you want to get your hands dirty, you can manually upgrade your Galaxy S20 device to One UI 3.0 right away by flashing the firmware using the Odin tool. And that’s what this tutorial is all about. So, let’s move on to the instructions.
Note: Flashing the official firmware via Odin does not break your phone’s warranty and also doesn’t trip KNOX. It’s a true and tried method used by Samsung Galaxy owners for years to manually update the software on their phones. You will also continue to receive OTA software updates on your phone after manually upgrading the phone using this method.
Before You Begin
Before you start performing the instructions, there are a couple of things you should do.
1. Take a Backup
First and foremost, take a complete backup of all your important data stored on the phone. Flashing the stock firmware via Odin does not erase the data. However, it’s best to safeguard your data in case anything goes unplanned.
The quickest and easiest way to take a complete backup is by using Samsung’s Smart Switch software. You could take a look at our article here on backing up different types of data stored on Android devices.
2. Install Required USB Drivers
While your Windows computer will generally install the required USB drivers for the phone automatically. But there are times it might not and Odin may fail to recognize your Galaxy S20 in Download Mode. In that case, it’s best that you download and manually install the latest Samsung USB drivers on your Windows computer.
3. Charge your Phone’s Battery
Charge your Galaxy S20 device to a minimum of 40-50% battery level. This will ensure that it doesn’t suddenly power off due to low battery while you’re performing the software upgrade.
Advertisement
How to Manually Install One UI 3.0 Update on Galaxy S20, S20+, and S20 Ultra
Manually updating your Galaxy S20 device to One UI 3.0 (Android 11) stable software is quite simple. All you have to do is download the firmware package and flash it to your phone using the Odin Flash Tool. To make it easier for you to understand and perform the update, we have split the instructions into five major steps.
Requirements
The only things you’ll need to perform this procedure are:
- Your Galaxy S20/S20+/S20 Ultra
- A Windows computer (Odin only works on Windows. For macOS/Linux, use Heimdall)
- And, a compatible USB-C cable
Now without any further ado, follow the instructions below.
Step 1: Download Android 11 (One UI 3.0) Firmware
The first step is to download the Android 11-based One UI 3.0 firmware for your Galaxy S20 device. At the time of publishing this tutorial, the Android 11 firmware is available with the following software build numbers for the corresponding models of the Samsung Galaxy S20 series.
| Device Name | Model | Android 11 Build Number |
| Galaxy S20 International variant | SM-G980F | G980FXXU5CTKG |
| Galaxy S20 5G | SM-G981B | G981BXXU5CTKG |
| Galaxy S20 Korean variant | SM-G981N | G981NKSU1CTKF |
| Galaxy S20 USA variant | SM-G981U | G981USQU1CTKH |
| Galaxy S20+ International variant | SM-G985F | G985FXXU5CTKG |
| Galaxy S20+ 5G | SM-G986B | G986BXXU5CTKG |
| Galaxy S20+ Korean variant | SM-G986N | G986NKSU1CTKF |
| Galaxy S20+ USA variant | SM-G986U | G986USQU1CTKH |
| Galaxy S20 Ultra International variant | SM-G988B | G988BXXU5CTKG |
| Galaxy S20 Ultra Korean variant | SM-G988N | G988NKSU1CTKF |
| Galaxy S20 Ultra USA variant | SM-G988U | G988USQU1CTKH |
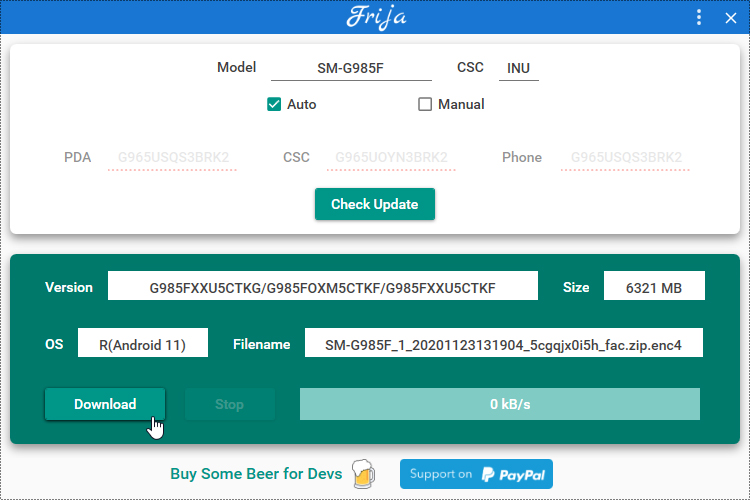
You can easily download the latest Android 11 firmware for your Galaxy S20 using Frija or Samloader tools. These tools can download the firmware directly from official Samsung update servers without any data speed caps. In order to use them, you will need your phone’s model number and CSC/regional code.
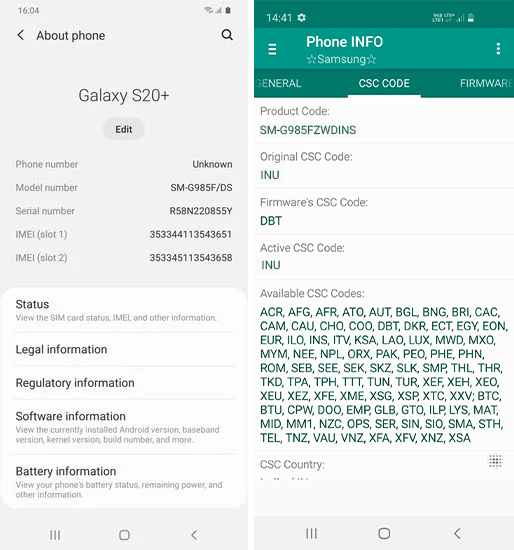
You can verify your phone’s model number by going to ‘Settings‘ → ‘About phone‘. As for your phone’s CSC code, you can view it by downloading and using the ‘Phone Info SAM‘ app from the Play Store.
Once you have the information, you can launch the Frija tool, input the required model number and CSC in the provided fields, and download the Android 11 firmware package for your Galaxy S20 to your computer.
Step 2: Extract the Firmware Binaries on Your Computer
The downloaded firmware package will be in .zip file format. You’ll need to extract the contents of the ZIP file to get individual firmware binaries. To do this, go to the location on your computer where the firmware package was downloaded/saved. Then right-click on the firmware ZIP file, select ‘Extract All’ and then ‘Extract’.
Advertisement
The extracted folder will contain the AP, BL, CP, CSC, and HOME_CSC firmware binaries in .tar.md5 file format (See the figure below for reference). These binaries are what you’ll be flashing to your Galaxy S20 in the steps that follow.
Notes
- ‘CSC’ and ‘HOME_CSC’ are essentially the same. The only difference is that the regular CSC erases all the data during the flash, while the HOME_CSC will preserve the data.
- If you have the One UI 3.0 beta installed on your Galaxy S20, it’s generally best to use the regular CSC and wipe off all the data to prevent any unusual errors from popping up afterward.
- If you have Android 10-based stable One UI 2.5 software installed, you could use the HOME_CSC instead. This will not erase any data on the phone.
Step 3: Boot Your Galaxy S20 into Download Mode
The Odin tool can only recognize and flash devices while they are in a special boot mode known as Download Mode.
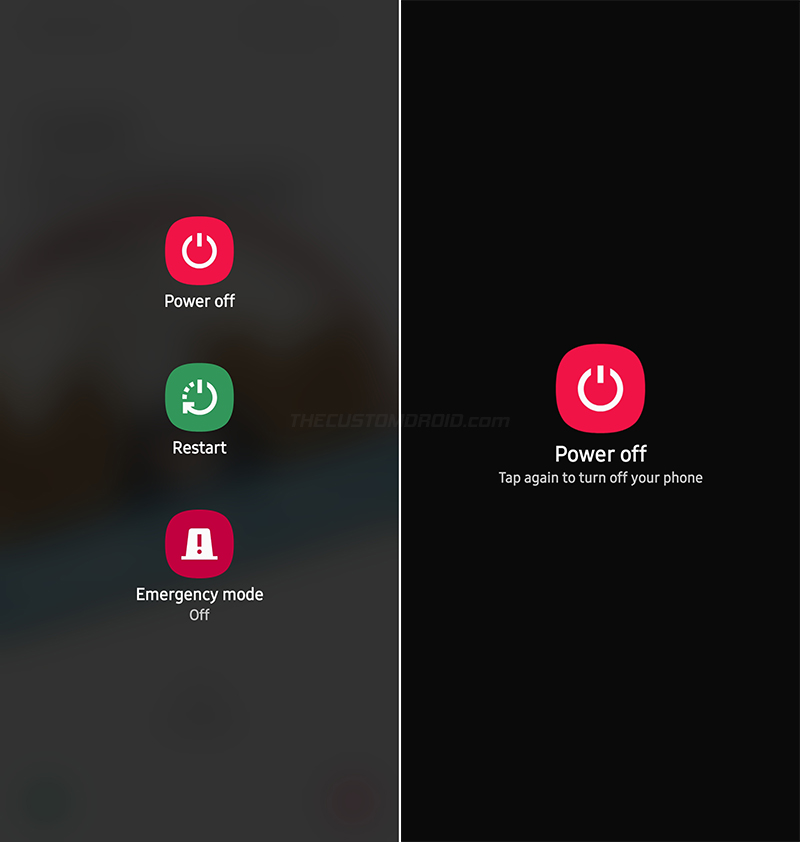
So, the third step is to boot your Samsung Galaxy S20 into Download Mode. To do this, hold your phone’s Side and Volume Down keys together until you see the Power menu on the screen. If you have re-configured the Side key, then simply hold it for a few seconds. Then select “Power Off” and press “Power off” again.
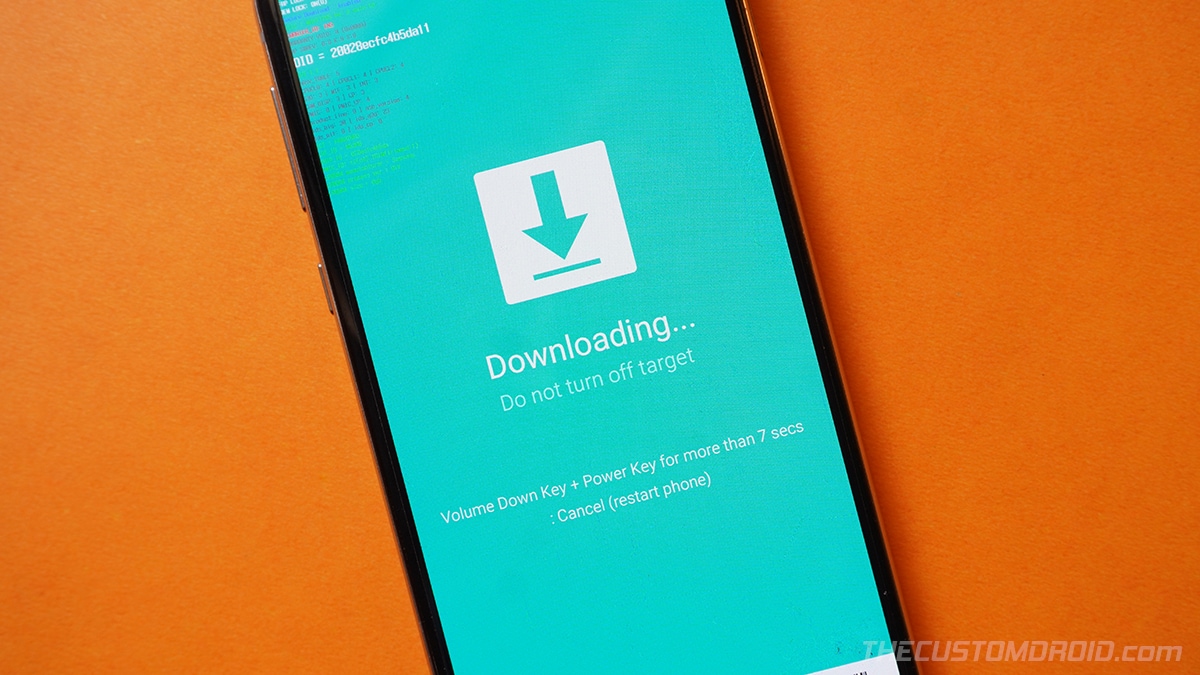
Once your phone is completely shut down, connect it to the computer via the USB-C cable while holding the Volume Up and Volume Down keys together. Release the keys when you see the blue-colored Bootloader screen.
Finally, tap the Volume Up key to enter Download Mode on your Galaxy S20. Here’s what it looks like:
Step 4: Download and Launch the Odin Flash Tool
Now that the phone is in Download Mode, it’s time to launch the Odin Flash Tool on your computer.
Advertisement
So, begin by downloading the latest version of Odin from this page and save the ZIP file to your computer. Then navigate to the folder where the Odin ZIP package was downloaded, right-click on it, select ‘Extract All’ and then ‘Extract’.
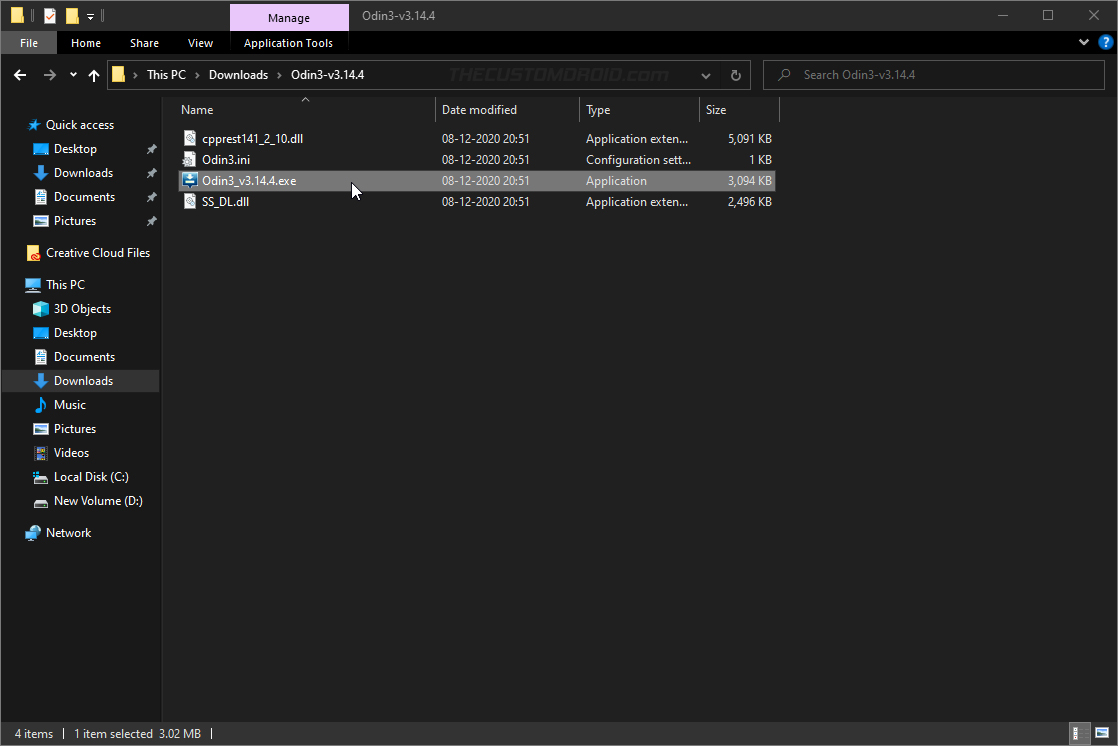
The extracted folder should contain the Odin binary, along with a couple of libraries, a configuration file. Now launch the Odin tool by double-clicking the ‘Odin3 v3.14.4.exe‘ executable.
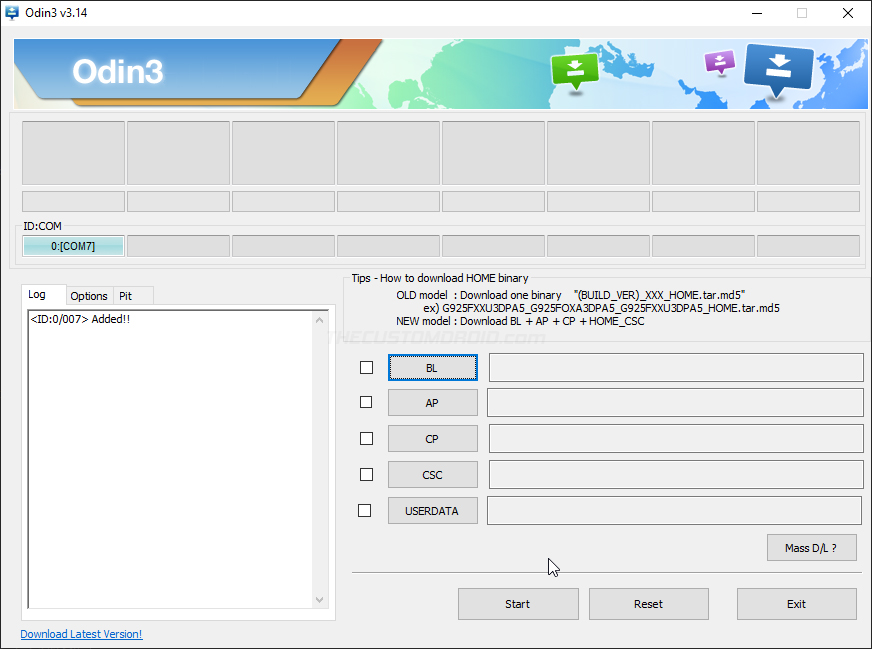
You should now see the tool’s interface on your computer screen. Odin will automatically recognize your Galaxy S20 in Download Mode and display the corresponding COM port number on the top-left of the interface.
Step 5: Flash Android 11 Firmware on Galaxy S20
With everything ready, it’s finally time to flash the Android 11-based One UI 3.0 firmware on your Galaxy S20 using Odin.
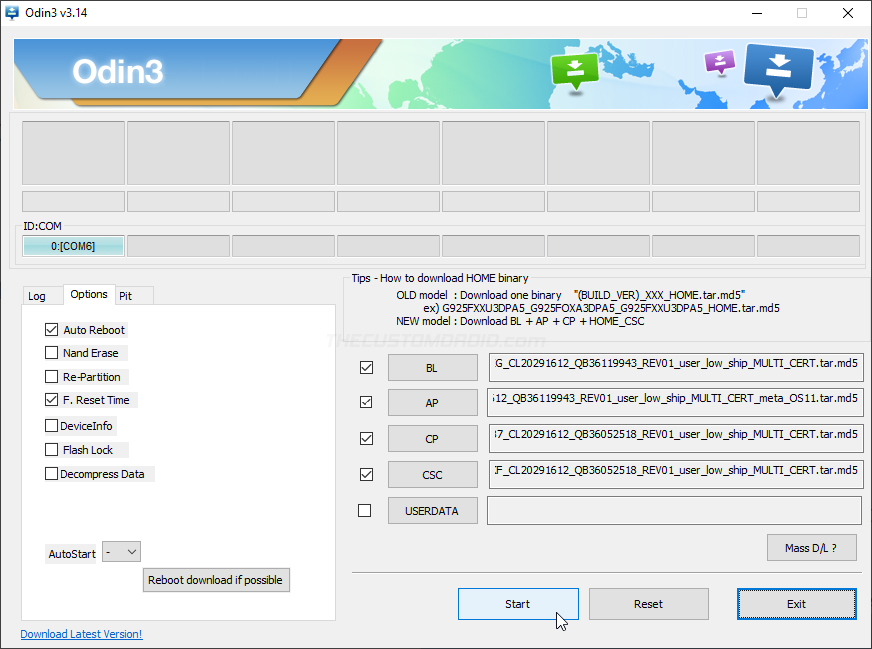
To flash, first load the firmware binaries in their corresponding slots in Odin as instructed below:
- First, click ‘BL‘ and select the BL firmware file (BL_xxxxxxxxxxx.tar.md5)
- Click ‘AP‘ and select the AP firmware file (AP_xxxxxxxxxxx.tar.md5)
- Next, click ‘CP‘ and select the CP firmware file (CP_xxxxxxxxxxx.tar.md5)
- Finally, click ‘CSC‘ and select the CSC firmware file (HOME_CSC_xxxxxxxxxxx.tar.md5)
- If you currently have the beta firmware installed, use the regular CSC which will perform a factory reset.
Once all the firmware binaries are loaded, click the ‘Options‘ tab in Odin and make sure that ‘Auto Reboot‘ and ‘F.Reset Time‘ options are checked. Finally, click ‘Start‘ to begin the flashing process and install the One UI 3.0 update on your Galaxy S20.
The process could take a few minutes to complete, so hold back and do not disrupt the USB connection. After it finishes, Odin will display the ‘PASS!‘ message and your phone will automatically reboot. You can safely disconnect it from the computer and close the Odin tool now.
Wrapping Up
When it boots, your Galaxy S20 will be running the latest Android 11 OS with One UI 3.0 sitting on top of it. So go ahead and explore all the new features that are offered in the update. Let us know what things you think have improved over the previous version.
We couldn’t help but agree with SamMobile when they say that “Samsung has been killing it with updates recently“. Samsung has indeed worked hard to change users’ old perception of the company being extremely slow at software updates, especially the major ones. With every passing year, we are seeing them getting absolutely better and quick at it.
The fact that the Galaxy S20 series got the stable Android 11 update in just under three months since the release is commendable. The company even went ahead and mentioned that the devices including the Galaxy Note 20, Z Fold 2, Z Flip, Note 10, Fold, and S10 series will also be receiving the One UI 3.0 update in the coming weeks.
So by now, you have learned how to download and manually install the Android 11-based One UI 3.0 update on the Galaxy S20 series. The process was extremely simple, but if you do find yourself in a difficult situation while performing it, let us know. Don’t forget to share your device’s model number, its CSC code, and the firmware it is currently on. This should help us answer your queries in a quick and more efficient manner.
