Are you experiencing issues with Android Oreo’s Bluetooth connectivity? You are not alone. After the launch of Android Oreo, many users have reported about the variety of problems in the OS. If you’re one who is looking on how to Fix Android Oreo Bluetooth Issue” then, I have to say, you are at right place.
Advertisement
Just a few days back, Google launched its latest Android Version, Android Oreo. It brings a lot of Awesome Changes & Features. But, just after the launch, several users reported about Android Oreo Bluetooth Problems. Such issues were previously discovered in Four Android O Developer Preview too.
— Android Oreo Features – 10 Awesome New Features & Changes
Page Contents
Overview: Android Oreo Bluetooth Issue
Right now, there is no any instant way to fix Android Oreo Bluetooth problem. But, Google is looking into it. So, the problem can be fixed as soon as possible. For addressing the Android Oreo Bluetooth Issue, Google is already gathering the reports. Following are a few symptoms that various users have reported across websites (AndroidPolice), forums and in the issue tracker.
Advertisement
- Bluetooth automatically switches OFF almost as soon as it’s turned ON.
- Lost connectivity while listening to calls, and music over Bluetooth in automobiles.
While Google addresses the bug with an OTA, we can only have patience. But there are several things that you can try first to see if it fixes the issue for you.
How To Fix Android Oreo Bluetooth Problem
Below are some tips that might come in handy to fix Android Oreo Bluetooth Issue on your Oreo powered device. These tips are basic things which may not affect your Bluetooth functionality in general. But, there is no problem in trying.
1. Toggle Bluetooth
This is one of the basic idea or tip that you might have already tried. If not, go ahead and try it out.
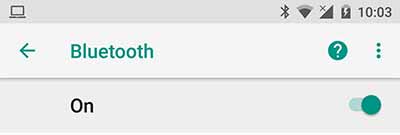
To turn Bluetooth on or off. Navigate to Settings > Connected devices > Bluetooth and switch the ON/OFF toggle. Sometimes, doing this may resolve the issue. If not, move to the next one
— How to Customize Android Oreo Navigation Bar without root
2. Reboot Your Phone
Rebooting our Android phone allows RAM to flush itself as well as “rest” when fully off, this gives the RAM some extra longevity. In simple language we can say, it gives your phone a break by cleaning the cache. If you are facing any Bluetooth Issue on Android Oreo phone, reboot your device and see if the issue is fixed.
Advertisement
3. Remove All Paired Devices
As you have just moved to the new version of Android, you should remove all the Paired Bluetooth devices and connect them again. You can remove to your old Paired Devices by just following the simple steps given below.
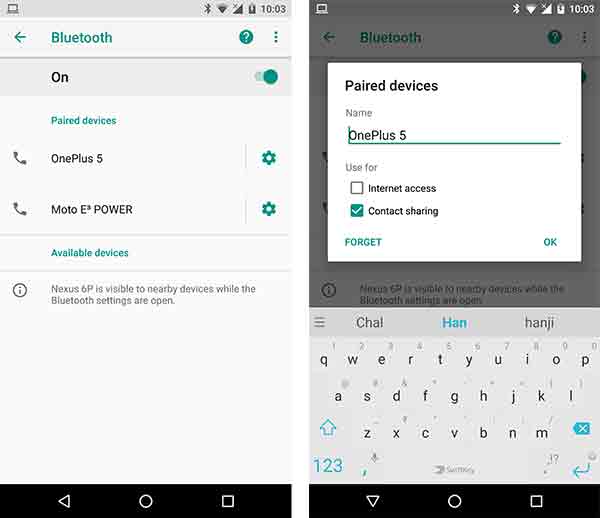
- Go to Phone Settings > Connected devices > Bluetooth.
- Tap on Turn On Bluetooth (in case if it is turned off).
- Now, all the Paired/Connected devices will be visible to you.
- Click on each Paired Device and then tap on forget/unpair.
- Now, scanning for Bluetooth connections will be started again.
Done. You have successfully removed all the Paired devices. Now, again choose your other Bluetooth device and pair with it. I hope, now this time it will be connected. If not, move to the next step.
— Tips To Fix Android Oreo Battery Drain Problem
4. Clear Bluetooth App Cache
At most times, issues with apps could be easily solved by clearing cache. Here, the same might be able to help us. Clearing Bluetooth App Cache can resolve Android Oreo Bluetooth issue. Just follow the steps given below to clear Bluetooth App Cache.
Advertisement
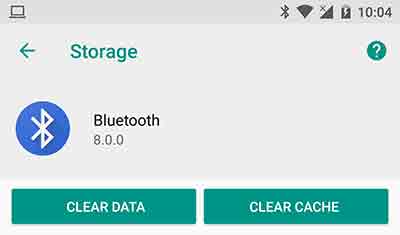
- Go to Phone Settings > Apps & notifications > App info.
- Tap on the 3-dot overflow menu on the top-right and tap on Show system.
- Scroll down and Tap on “Bluetooth”.
- Now, press “Storage” and select “CLEAR CACHE”.
5. Reset Network Settings
Resetting Network Settings will reset all your wireless settings at once including saved Wi-Fi networks, clear mobile data limits, paired devices and remove all app data restrictions. To reset Network Settings, Just follow the given steps below.
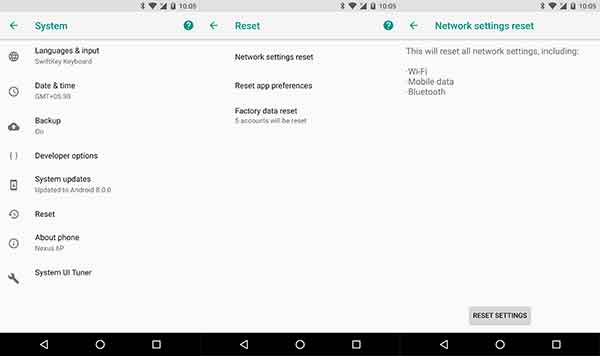
- Go to Phone Settings > System > Reset
- Tap on Network settings reset.
- Now, confirm RESET SETTINGS.
This will reset all your settings related to Wi-Fi, Bluetooth, and mobile data.
6. Reboot into Safe Mode
Rebooting into Safe Mode is quite different from simply rebooting. Rebooting into Safe Mode disables third party apps and hence can help you identify any mischievous apps. If Bluetooth is working fine in safe mode then it means a third-party app is causing problems. Now, you can remove that particular app which is making your Bluetooth to do unnecessary activities. To reboot in safe mode, just follow the below steps.
- Press and hold your phone’s power button.
- Now, it will prompt you to turn off your phone.
- tap and hold Power off until your phone asks you to confirm that you want to enter safe mode.
- Now, confirm.
- Done. You are in safe mode.
When in safe mode, start by operating the normal Bluetooth functions and see if it helps in any manner.
7. Disable Battery Optimization
Sometimes battery optimization also disturbs Bluetooth functionality. Hence, disabling battery optimization for the Bluetooth app might be useful. So, turn your battery saver/optimizer off using the following steps.
Advertisement
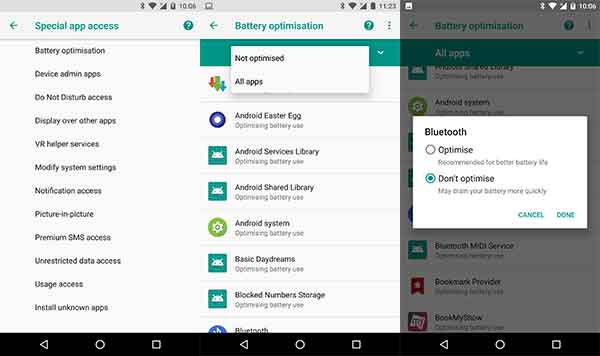
- Go to Settings > Apps & notification > Special app access.
- Tap on Battery optimisation.
- Press the drop down menu at the top and select “All apps”.
- Tap on Bluetooth and select “Don’t optimise”.
I hope, disabling battery optimization will work for you otherwise, the last resort is to wait for a bug fix from the OEM.
Wait For The Next OTA Update
This is the last hope for all the Android Oreo devices which are affected by the variety of bugs. Currently, Google is working to fix Android Oreo Bluetooth problem along with other mainstream bugs that might have been reported.
More for you:
- How to Enable Instant Apps on Android
- How to Install AOSP 8.0 Oreo ROM for Xiaomi Mi 3 and Mi 4
- Install Android O Emoji on Any Android 5.0+ Devices
So, that’s all the help we could provide you on How to Fix Android Oreo Bluetooth Issues. I hope the tips would have been helpful to some if not all. Let us know, your problem if this fixed your issue or not? And don’t forget to share this article with your friends who are suffering from the same.