Boot Samsung Galaxy Note 10 and Note 10+ into Download and Recovery Modes
Booting your Galaxy Note 10 device into pre-boot modes like Download Mode or Recovery Mode could come in handy in various situations. The former allows you to flash stock firmware or custom […]
Booting your Galaxy Note 10 device into pre-boot modes like Download Mode or Recovery Mode could come in handy in various situations. The former allows you to flash stock firmware or custom binaries like TWRP recovery and Magisk via Odin Flash Tool. The latter, on the other hand, lets you fix soft bricks, sideload OTA updates via ADB/SD card, or perform a factory data reset. Through this guide, you will learn how to boot your Samsung Galaxy Note 10 and Note 10+ into Recovery/Download Mode.
Advertisement
If you’re new to this, we encourage that you read below and first learn what these modes actually are and the purpose they serve. If you’re already a hardcore modder, you’d probably be well-acquired with these modes already. So in that case, you can just skip this and directly head over to the instructions.
- What is Download Mode? Download Mode in Galaxy Note 10 is a dedicated pre-boot mode that allows you to flash the official stock firmware or custom binaries like TWRP, pre-patched Magisk AP firmware file, etc to your phone via the Odin Flash Tool.
- What is Recovery Mode? Recovery Mode in the Galaxy Note 10 is the partition where the recovery console (stock or custom) is installed. It lets you perform various different actions, like doing a factory data reset, wiping the /cache partition, running graphics test, installing OTA update packages manually, and much more.
Both the pre-boot modes hold immense importance, especially when you’re into the Android development/customization scene. Even if you’re an average user, these modes could help you troubleshoot or fix certain software-related issues on your own.
Page Contents
How to Boot Galaxy Note 10 into Recovery/Download Mode
Booting your Note 10 and 10+ into Recovery/Download Mode could be done using two different methods.
Advertisement
Advertisement
First, by using a dedicated combination of physical buttons, which works without a PC. Unlike the Galaxy S10 series, Note 10 and Note 10+ do not have a dedicated Bixby key, which also changes the behavior of how the power button works on the Note 10 works. In my personal experience, this makes the process of entering Recovery/Download Mode on the Galaxy Note 10 and Note 10+ much easier and streamlined. So, instead of memorizing two different button combinations for each mode, you will only need to know one.
Or second, by using an ADB command which is helpful especially when following tutorials that require the use of ADB. For Method 2 in either case, you will need a computer and a USB cable. Also, make sure to install the latest Android SDK platform-tools on your PC and enable USB debugging on your Note 10/10+ first.
Advertisement
- To boot your Galaxy Note 10 or Note 10+ into Recovery/Download Mode, you must first power off the phone.
- To do so, hold the Volume Down and Power buttons until the power menu appears.
- Then tap on “Power off” and again on “Power off” to turn off your phone.
- Now press and hold the Volume Up and Power buttons together to boot your Galaxy Note 10/Note 10+ into Recovery Mode.
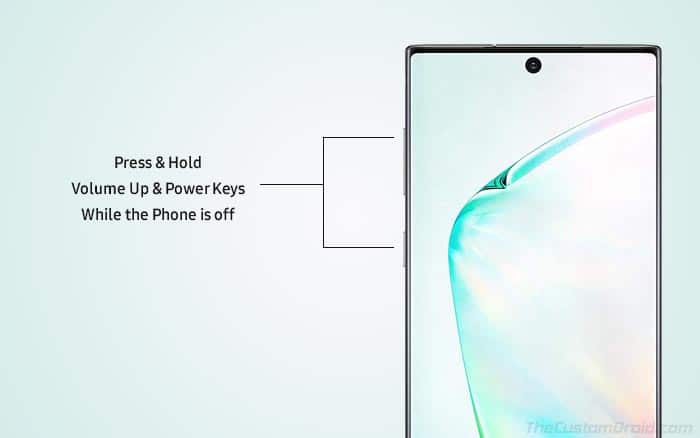
- The phone will vibrate and enter the stock recovery mode. You can release the buttons now.
- From hereafter, follow the next few steps to easily boot your phone directly into Download Mode.
- Use the Volume buttons to highlight the “Reboot to bootloader” option.
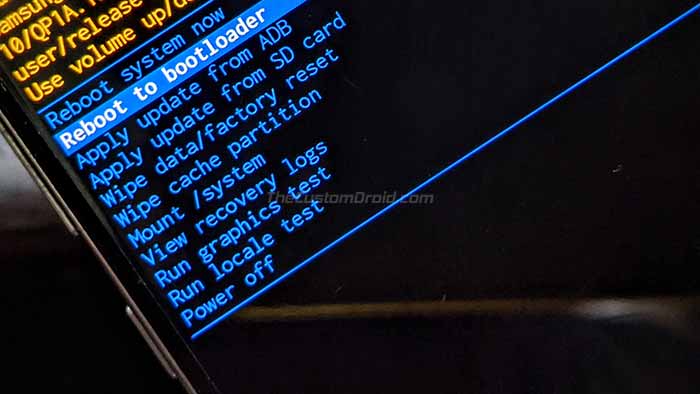
- Finally, press the Power button to confirm and boot your Galaxy Note 10 or Note 10+ into Download Mode.
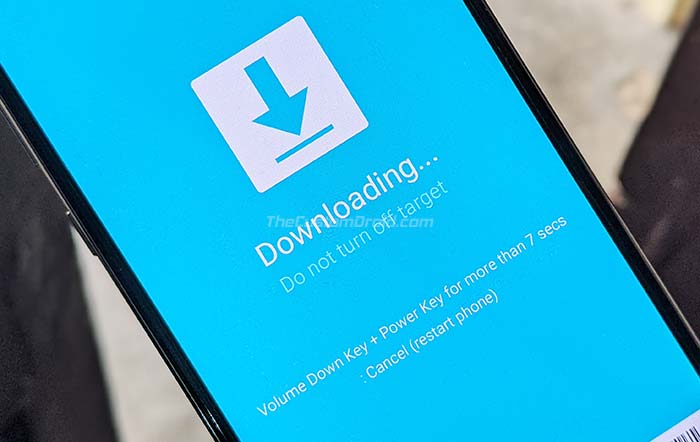
Method 2: Using ADB Command
- To boot into Recovery/Download Mode using ADB, connect your Note 10 to the PC using the USB cable.
- Ensure that USB debugging is enabled on your phone.
- Launch the command-line windows on your PC.
- PowerShell in Windows: Open the folder where the Android SDK platform-tools are present (e.g. C:\platform-tools). Then hold the SHIFT key and right-click on an empty space inside the folder, then select the ‘Open PowerShell window here’ option.
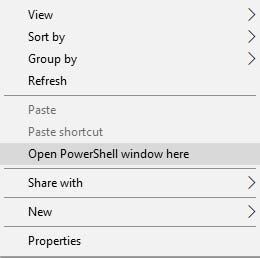
- Terminal in Linux/macOS: ‘cd’ to the extracted ‘platform-tools’ folder on your PC. For example: If you extracted the platform-tools to the ‘Documents’ folder, then the command should look like:
cd Documents/platform-tools
- PowerShell in Windows: Open the folder where the Android SDK platform-tools are present (e.g. C:\platform-tools). Then hold the SHIFT key and right-click on an empty space inside the folder, then select the ‘Open PowerShell window here’ option.
- Enter the following command to establish an ADB connection between the device and the PC:
adb devices
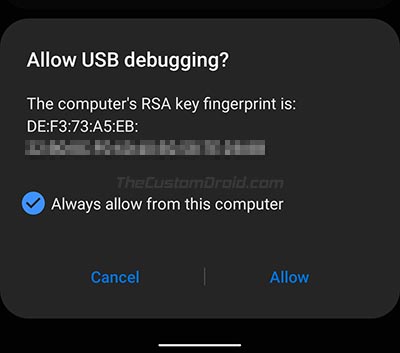
- As soon as you enter the command, a message will appear on your Note 10’s screen, prompting you to allow USB debugging. So, tap on “Allow”.
- Finally, enter the following ADB command:
- To boot your Galaxy Note 10/Note 10+ into Recovery Mode:
adb reboot recovery
- To boot your Galaxy Note 10/Note 10+ into Download Mode:
adb reboot bootloader
- To boot your Galaxy Note 10/Note 10+ into Recovery Mode:
Your phone will power off and automatically enter the Recovery or Download Mode depending on the command you have entered.
Advertisement
That’s it! If you have booted your phone into recovery, then you can use it to perform a factory reset, sideload an OTA package, and do much more. Even if you have a custom recovery such as TWRP installed on your Galaxy Note 10 device, the method to boot into the recovery mode stays the same.
On the other hand, if you’ve entered the Download Mode, then your phone is ready-to-flash using the Odin tool. So, you can use it to restore the stock firmware or flash custom binaries such as TWRP, Magisk, etc.
So, this was our guide on how to boot Samsung Galaxy Note 10 and Note 10+ into Recovery/Download Mode. If you have any questions regarding the usage of these pre-boot modes or the instructions listed here, then please let us know via the comments.
