How to Install Android Oreo AOSP ROM on Nexus 5
Android Oreo 8.0 was officially released a week ago. And it had been rolled out into the Google Pixel along with the Nexus devices. Google afterward released the factory images for all […]
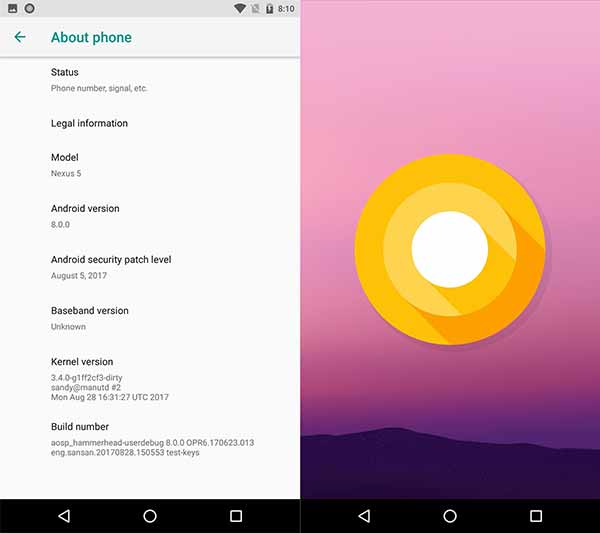
Android Oreo 8.0 was officially released a week ago. And it had been rolled out into the Google Pixel along with the Nexus devices. Google afterward released the factory images for all these devices and programmers are currently trying to make customized ROMs according to Android Oreo due to their devices. Today, we are here to help you install Android Oreo AOSP ROM on Nexus 5 so that you can cherish all the exciting new features.
Advertisement
The Google Nexus 5 was launched 4 years ago with Android Lollipop 5.0. Google has already declared its official support deadline, so there is no possibility of an official Oreo update for the device. However, the Nexus 5 was updated to Android Nougat and now to Android Oreo via the unofficial builds compiled by developers at the XDA forum.
Read more about the ROM below and know how to install Android Oreo AOSP ROM on Nexus 5 right now!
Advertisement
Read – Install Android O Emoji on Any Android 5.0+ Devices
Page Contents
Android Oreo AOSP ROM on Nexus 5
The ROM has been brought to the public by XDA Developer – Santhosh M.
The current Android 8.0 Oreo AOSP ROM for Nexus 5 is in the early Alpha stage. For now, WiFi is the only thing that works in this build. The programmer might release a more stable version of this ROM in the future. If you’re not into experimentation or testing, I would recommend that you simply turn around from here.But as of today, you can’t use this ROM as a daily driver. But if You Wish to test Android Oreo or experience how it functions, you can try installing Android 8.0 Oreo AOSP ROM On Google Nexus 5.

But if you really wanna see it on your device, you can contribute to the development by providing ideas and real-time code fixes if you have the knowledge. For now, you can’t use this ROM as a daily driver. The fact that the ROM boots is a good thing in itself, other things will be worked around much sooner. If you wish to test Android Oreo or experience how it functions, you can try installing Android Oreo AOSP ROM On Nexus 5.
Read – How to Install Android Oreo ROM on ASUS Zenfone 5
Requirements
- Ensure you’ve already unlocked the bootloader on your Nexus 5 and have TWRP installed on it.
- Make sure your phone has over 50-60% battery charge to avoid any shutdowns during the process.
- Take a Nandroid backup of your current ROM. If something goes wrong or you don’t like to stick to it, you can always restore.
Downloads
- Download AOSP 8.0 ROM For Nexus 5: Here
- TWRP Recovery For Nexus 5: Here
- Magisk Zip File Latest: Here
Steps to Install Android Oreo AOSP ROM on Nexus 5
If you’ve installed TWRP, you can follow the actions mentioned below to install the Android Oreo AOSP ROM on Nexus 5 using TWRP.
- Download the ROM, GApps, and the Magisk files and transfer all of them to the Nexus 5’s internal storage.
- Power off your device completely.

- Reboot into TWRP – Press the Volume Down and Power buttons altogether until you see the bootloader mode. Tap the volume keys a few times until you see “Recovery mode” on the screen and press the power button to select it.
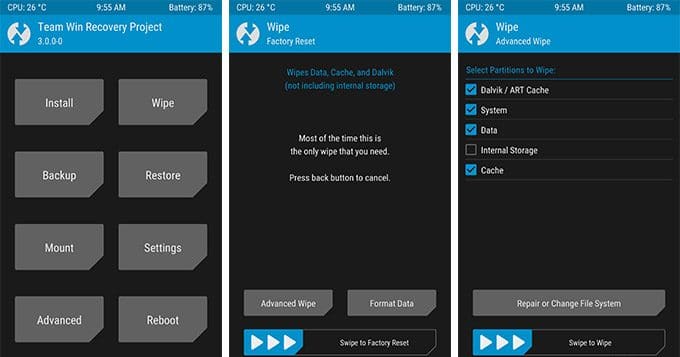
- In TWRP, go to Wipe > Advanced Wipe and select the following options – Dalvik/ART Cache, System, Data, and Cache. Swipe the button to confirm the process.

- Now return to the main menu and then choose “Install”.
- Navigate the storage and select the ROM zip (Example: aosp_hammerhead_oreo-8.0.0-20170828.zip).
- Tap on the “Add more Zips” button and now choose the GApps and Magisk file consecutively.
- Now swipe at the button on the bottom to initiate the flashing process.
- Then reboot your Nexus 5 by pressing the “Reboot System”.
So you have just downloaded and installed Android Oreo AOSP ROM on Nexus 5. Start by taking a feel of how Oreo works. We are certain that the developer will bring more fixes and improvements to the ROM.
More for you – How to Customize Android Oreo Navigation Bar without root
Don’t forget to share this article with fellow Nexus 5 users! If you face any problems during installation, drop a comment below.
